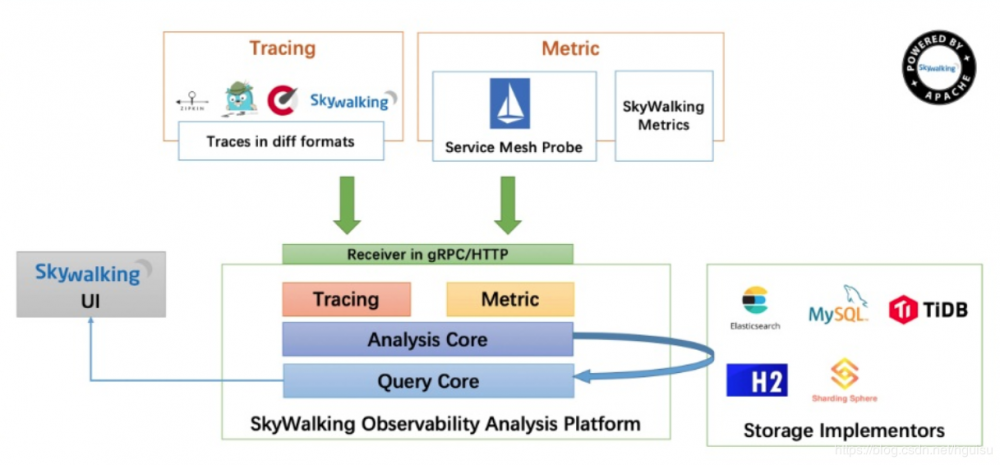
1、skywalaking架构
skywalaking总体架构分为4部分
skywalking-agent:
探针,用来收集和发送数据到归集器,主要采集tracing(调用链数据)和metric(指标),使用 JavaAgent 做字节码植入,无侵入式的收集,并通过 HTTP 或者 gRPC 方式发送数据到 SkyWalking Collector。
skywalking-collector:
链路数据归集器,对agent传过来的tracing和metric数据进行整合分析, 通过Analysis Core模块处理并落入相关的数据存储中,同时会通过Query Core模块进行二次统计和监控告警. 数据可以落地ElasticSearch,单机也可以落地H2,不推荐,H2仅作为临时演示用.
UI:
web可视化平台,用来展示落地的数据. 目前官方采纳了RocketBot作为SkyWalking的主UI
Storage:
Skywalking的存储,支持以ElasticSearch、Mysql、TiDB、H2等作为存储介质进行数据存储
2、skywalaking工作流程
skywalking的核心在于agent部分,下图展示了一次调用跨多个进程里agent的详细的运行过程:
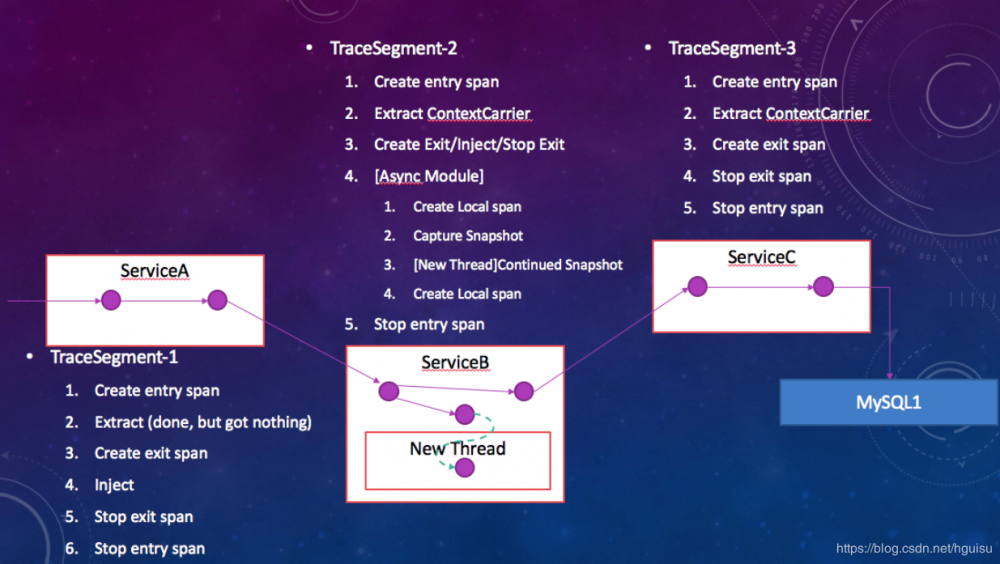
这里反映了 skywalking 追踪的核心概念以及我们做的事情,就是 skywalking 怎么采集调用链。
1)、入口跟踪信息:对于入口,不管外围调用是否前置,都会创建一个 entry span,然后走 Extract ,提取前置上下文,当然第一个点没有前置,所以什么都没拿到。然后会创建一个 exit span ,创建一个最出的埋点。之后会做一个 inject的操作,把当前的上下文放在 HTTP 的头里面,顺带这个 HTTP的调用发到 Service B 上。
2) 调用服务跟踪信息:Service B接收请求后 上,也会同样地创建 TraceSegment ,创建 entry ,然后 Extract 提取 ContextCarrier ,这时它与 1 肯定是不一样的,因为前面做了 inject ,注入了上下文,因此这边一定能够拿到上下文,那么它就会做一个 Segment2 和 Segment1 的绑定关系。
3)最后面 TraceSegment3 也是一样的,Create 、Extract、exit、stop 退出来。
三、快速开始
官方文档: https://github.com/apache/skywalking/blob/v5.0.0-alpha/docs/cn/Quick-start-CN.md
基于springboot项目部署skywalking:
第一步:下载包:
进入官方release地址https://github.com/OpenSkywalking/skywalking/releases,分别下载skywalking-collector,skywalking-web,skywalking-agent,解压后,归集器和web应用都会有一个bin目录,单机模式下,不需要改配置,直接执行对应的脚本即可. 包的结构如图:
agent: 探针
bin:收集器启动脚本
config:数据收集器
webapp:web ui
第二步:启动skywalking收集器服务
启动脚本是 ./apache-skywalking-apm-bin/bin/startup.sh,启动之后我们就可以访问 http://localhost:8080/ 就可以看到skywalking的ui界面了。
我这里 http://192.168.10.31:8080/
单机模式默认使用本地H2数据库,不支持集群部署。主要用于:预览、功能测试、演示和低压力系统。如果使用单机collector用于非演示环境,你可选择使用Elasticsearch作为存储实现。
第三步:配置需要监控的应用的agent探针
拷贝agent目录到所需位置,日志、插件和配置都包含在包中,不要改变目录结构。可修改agent.config配置agent.application_code=xxl-job为自己的应用名
增加JVM启动参数,-javaagent:/path/to/skywalking-agent/skywalking-agent.jar。参数值为skywalking-agent.jar的绝对路径。
启动被监控应用。
使用现成的spring boot项目client:
package com.turing.skywalking.web;

/**
 * Created by huangguisu on 2019/10/28.
 */

import org.springframework.boot.SpringApplication;
import org.springframework.web.bind.annotation.RestController;
import org.springframework.web.bind.annotation.GetMapping;
import org.springframework.web.bind.annotation.RequestMapping;

import org.springframework.boot.autoconfigure.SpringBootApplication;

import org.springframework.web.client.RestTemplate;
import org.springframework.context.annotation.Bean;

@RestController
@SpringBootApplication
public class ClientApplication {

    @Bean
    RestTemplate restTemplate(){
        return new RestTemplate();
    }
    @GetMapping("/hello")
    public String hello(){
        return this.restTemplate().getForEntity("http://localhost:9081/hello",String.class).getBody();
    }
    @RequestMapping("test")
    public String test() {
        if (true) {
            throw new RuntimeException("aexception occured");
        }
        return "Hello World2";
    }
    public static void main(String[] args) {
        SpringApplication.run(ClientApplication.class, args);
    }
}
service:
package com.turing.skywalking.web;

/**
 * Created by huangguisu on 2019/10/28.
 */

import org.springframework.boot.SpringApplication;
import org.springframework.boot.autoconfigure.SpringBootApplication;
import org.springframework.context.annotation.ImportResource;
import org.springframework.web.bind.annotation.RestController;
import org.springframework.web.bind.annotation.GetMapping;
@SpringBootApplication
@RestController
@ImportResource(locations = {"classpath:applicationContext.xml"})
public class SerivceApplication {

    @GetMapping("/hello")
    public String hello(){
        return "Hello World";
    }
    public static void main(String[] args) throws Exception {
        SpringApplication.run(SerivceApplication.class, args);

    }
}
启动client:
1)复制agent目录:cp /mnt/app/apache-skywalking-apm-bin/agent/ /mnt/app/skywalking-client/ -R
2)复制spring-annotation插件: 由于springboot都是注解实现,启动需要插件apm-spring-annotation-plugin-8.0.0.jar才能看到详细项目内部调用信息。将/agent/optional-plugins目录下的agent/optional-plugins/apm-spring-annotation-plugin-8.0.0.jar移动到/agent/plugins,
3)修改配置:skywalking-client/agent/config/agent.config
agent.service_name=skywalking-client # 如果不修改,否则默认Your_ApplicationName,控制后台就好标识出项目.
collector.backend_service #默认127.0.0.1:11800
4)nohup启动:nohup java -jar -javaagent:/mnt/app/skywalking-client/agent/skywalking-agent.jar ./skywalking-client-1.0-SNAPSHOT.jar &
启动参数可以改成:
-javaagent:/mnt/app/skywalking-client/agent/skywalking-agent.jar
-Dskywalking.agent.service_nameskywalking-client
-Dskywalking.collector.backend_service=localhost:11800
其中:
-Dskywalking.agent.service_name:用于重写agent/config/agent.config 配置文件中的服务名
-Dskywalking.collector.backend_service:用于重写agent/config/agent.config配置文件中的服务地址
启动service类似:
1)复制agent目录:cp /mnt/app/apache-skywalking-apm-bin/agent/ /mnt/app/skywalking-service/ -R
2)修改配置:skywalking-service/agent/config/agent.config
agent.service_name=skywalking-service# 如果不修改,否则默认Your_ApplicationName
3)nohup启动:nohup java -jar -javaagent:/mnt/app/skywalking-service/agent/skywalking-agent.jar ./skywalking-service-1.0-SNAPSHOT.jar &
查看拓扑信息
默认skywalking会抓取100%的请求,可以修改agent.config配置文件中的agent.sample_n_per_3_secs配置项配置抓取的请求的百分比

修改skywalking收集器服务数据库存储
目前Skywalking支持h2、mysql、ElasticSearch作为数据存储 :
SkyWalking是默认的h2,h2是一种内存数据库,数据保存在内存中,只要服务重启或是Skywalking应用故障了,基本上所监控到的数据也就丢失了,因此h2的内存模式其实不适合于应用服务长时间监控的场景。
官网好像是推荐使用ElasticSearch。ES(ElasticSearch)是一款分布式全文检索框架,底层基于Lucene实现,是给搜索引擎专用的,搜索性能非常好。
修改SkyWalking的存储配置,将h2内容注释掉,nameSpace需要与elasticsearch的cluster.name保持一致
四、skywalking与日志组件
skywalking的traceId与日志组件(log4j,logback,elk等)的集成
只要在日志配置xml中增加以下配置,则在打印日志的时候,自动把当前上下文中的traceId加入到日志中去。
1、和logback使用
文档: https://github.com/apache/skywalking/blob/v8.0.0/docs/en/setup/service-agent/java-agent/Application-toolkit-logback-1.x.md
添加依赖:
<dependency>
    <groupId>org.apache.skywalking</groupId>
    <artifactId>apm-toolkit-logback-1.x</artifactId>
    <version>{project.release.version}</version>
</dependency>
配置:
<appender name="console" class="ch.qos.logback.core.ConsoleAppender">
    <layout class="org.apache.skywalking.apm.toolkit.log.logback.v1.x.TraceIdPatternLogbackLayout">
         <pattern>
             %d{yyyy-MM-dd HH:mm:ss} [%thread] %-5level %logger{36} - %tid - %msg%n
         </pattern>
    </layout>
</appender>
2、log4j2
官方文档: https://github.com/apache/skywalking/blob/v8.0.0/docs/en/setup/service-agent/java-agent/Application-toolkit-log4j-2.x.md
添加依赖:
<dependency>
   <groupId>org.apache.skywalking</groupId>
   <artifactId>apm-toolkit-log4j-2.x</artifactId>
   <version>{project.release.version}</version>
</dependency>
log4j2.xml配置:
<Appenders>
   <Console name="Console" target="SYSTEM_OUT">
      <PatternLayout pattern="%d [%traceId] %-5p %c{1}:%L - %m%n"/>
   </Console>
</Appenders>
链路中的所有节点的traceId是一样的,skywalking web发现性能差的traceId后,再去日志组件中查看日志是否有异常日志。
五、skywalking 的限制
1、跨线程的场景不支持自动代理,比如任务分配,任务池,批处理的场景。
类似我们如下场景:
我们服务A需要同时调用服务C和服务D,这个时候肯定不是串行调用,而是通过线程池并发调用服务C和服务D, 我们实验这个场景,链路跟踪没有生效。
这个应该是skywalking需要特殊处理。
import org.springframework.context.annotation.Bean;
import org.springframework.stereotype.Service;
import org.springframework.web.client.RestTemplate;

import java.util.ArrayList;
import java.util.List;
import java.util.concurrent.*;

/**
 * Created by huangguisu on 2020/6/30.
 */
@Service
public class ServiceHello {
    private abstract class CallableException implements Callable<String> {
    }
    private ExecutorService executorService = new ThreadPoolExecutor(2, 2,
            0L, TimeUnit.MILLISECONDS,
            new ArrayBlockingQueue<Runnable>(100));

    public void asynTest() {
        List<Callable<String>> tasks = new ArrayList<>();
        System.out.println("exe:asynTest" );
        tasks.add(new CallableException() {
            @Override
            public String call() {
                try {
                    RestTemplate restTemplate = new RestTemplate();
                    String postData = "{/"code/":200}";
                    String res =  restTemplate.postForEntity("http://localhost:9081/hello2",  postData, String.class).getBody();
                    return res;
                } catch (Exception e) {
                    e.printStackTrace();
                    return "";
                }
            }
        });

        tasks.add(new CallableException() {
            @Override
            public String call() {
                try {
                    RestTemplate restTemplate = new RestTemplate();
                    String postData = "{/"code/":200}";
                    String res =  restTemplate.postForEntity("http://localhost:9082/hello3",  postData, String.class).getBody();
                    return res;
                } catch (Exception e) {
                    e.printStackTrace();
                    return "";
                }
            }
        });

        try {
            List<Future<String>> mFuture = executorService.invokeAll(tasks, 10, TimeUnit.SECONDS);
            String  result1 = mFuture.get(0).get();
            if (result1.equals("")) {
                System.out.println( "result1 empty");
            } else {
                System.out.println( "Future1 result:" + result1);
            }
            String  result2 = mFuture.get(1).get();
            if (result2.equals("")) {
                System.out.println( "result2 empty");
            } else {
                System.out.println( "Future2 result:" + result1);
            }

        } catch (Exception e) {
            e.printStackTrace();
        }
    }
}
参考资料
更多学习
更多实时资讯,前沿技术,生活趣事。尽在【老马啸西风】
交流社群:[交流群信息](https://mp.weixin.qq.com/s/rkSvXxiiLGjl3S-ZOZCr0Q)
