依赖 jar 的手动下载
lib
mysql-connector-j-8.2.0.jar neo4j-java-driver-4.4.9.jar
seatunnel connectors
connector-cdc-mysql connector-cdc-mongodb connector-elasticsearch connector-jdbc connector-kafka connector-mongodb connector-neo4j
环境准备
CentOS 7.6.18_x86_64 JDK >= 1.8.151 Maven >= 3.6.3 Apache Seatunnel ==2.3.3 Apache Seatunnel Web == 1.0.0
windows WSL 安装实战笔记
jdk
$ java -version
openjdk version "1.8.0_402"
OpenJDK Runtime Environment (build 1.8.0_402-8u402-ga-2ubuntu1~22.04-b06)
OpenJDK 64-Bit Server VM (build 25.402-b06, mixed mode)
maven 安装
mvn -v

$ mvn -v
Apache Maven 3.5.4 (1edded0938998edf8bf061f1ceb3cfdeccf443fe; 2018-06-18T02:33:14+08:00)
Maven home: /mnt/d/tool/maven/apache-maven-3.5.4
Java version: 1.8.0_392, vendor: Private Build, runtime: /usr/lib/jvm/java-8-openjdk-amd64/jre
Default locale: en, platform encoding: UTF-8
OS name: "linux", version: "5.15.133.1-microsoft-standard-wsl2", arch: "amd64", family: "unix"
WSL 内核版本
$ uname -a
Linux d 5.15.146.1-microsoft-standard-WSL2 #1 SMP Thu Jan 11 04:09:03 UTC 2024 x86_64 x86_64 x86_64 GNU/Linux
创建安装软件目录
创建+下载 backend
创建seatunnel后端服务安装目录
文件前缀根据自己的需求创建即可。
# 创建文件夹
sudo mkdir -p /wls/wls81/bigdata/seatunnel-2.3.4/backend
cd /wls/wls81/bigdata/seatunnel-2.3.4/backend

# 获取解压
sudo wget https://dlcdn.apache.org/seatunnel/2.3.4/apache-seatunnel-2.3.4-bin.tar.gz
sudo tar -zxf apache-seatunnel-2.3.4-bin.tar.gz

# 重命名(这个可选,解压之后发现就是 apache-seatunnel-2.3.3)
mv apache-seatunnel-2.3.4-bin apache-seatunnel-2.3.4
配置环境变量
说明:SEATUNNEL_HOME 在我们用 shell 脚本安装 connector jar 会用到,当然也建议配置一下。
配置 /etc/profile,添加内容:
直接 vi 修改
sudo vi /etc/profile
加在末尾。
export SEATUNNEL_HOME=/wls/wls81/bigdata/seatunnel-2.3.4/backend/apache-seatunnel-2.3.4
export PATH=$SEATUNNEL_HOME/bin:$PATH
因为我配置过 jdk8,所以整体改为:
export JAVA_HOME=/usr/lib/jvm/java-8-openjdk-amd64/jre
export SEATUNNEL_HOME=/wls/wls81/bigdata/seatunnel-2.3.4/backend/apache-seatunnel-2.3.4
export PATH=$SEATUNNEL_HOME/bin:$JAVA_HOME/bin:$PATH
配置立刻生效:
source /etc/profile
验证
$ echo $SEATUNNEL_HOME
/wls/wls81/bigdata/seatunnel-2.3.4/backend/apache-seatunnel-2.3.4
说明:这里必须要正确配置,应为插件的加载需要依赖这个配置。
安装 backend 后端
默认启动驱动
首先看一下 connector 驱动包有哪些东西:
cd /wls/wls81/bigdata/seatunnel-2.3.4/backend/apache-seatunnel-2.3.4/connectors

$ ll
total 284
drwxr-xr-x  2 root root   4096 Mar 29 13:26 ./
drwxr-xr-x 10 root root   4096 Nov  9 06:14 ../
-rw-r--r--  1 root root  76217 Nov  9 06:14 connector-console-2.3.4.jar
-rw-r--r--  1 root root 196426 Nov  9 06:14 connector-fake-2.3.4.jar
-rw-r--r--  1 root root   5660 Nov  9 06:14 plugin-mapping.properties

$ cd seatunnel/
dh@d:~/bigdata/seatunnel-2.3.3/backend/apache-seatunnel-2.3.3/connectors/seatunnel$ ls
connector-console-2.3.3.jar  connector-fake-2.3.3.jar
发现和 v2.3.3 对比,这里的 connector jar 包直接放在了默认的 connectors 路径下面,不需要放在 connectors/seatunnel 了?
简单的文件说明:
plugin-mapping.properties 这个是映射文件,指定了插件名称和插件的映射关系。
connector-console-2.3.4.jar 控台输出连接器
connector-fake-2.3.4.jar 虚假的数据源连接器
安装seatunnel过程中,解压文件后官方默认提供的connector的jar包只有2个,要想连接mysql,oracle,SqlServer,hive,kafka,clickhouse,doris等时,还需下载对应的jar包。
下载插件
使用本地Maven加速下载connector相关jar包
seatunnel下载connector的jar时,使用mvnw来下载jar包,默认是从https://repo.maven.apache.org 下载,速度及其缓慢。
我们可以改成自己在linux系统上安装的mvn,配置阿里云远程仓库地址,从阿里云mvn源下载会快很多, 下面教大家如何进行修改。
$ cd /wls/wls81/bigdata/seatunnel-2.3.4/backend/apache-seatunnel-2.3.4/bin

$ pwd
/wls/wls81/bigdata/seatunnel-2.3.4/backend/apache-seatunnel-2.3.4/bin

$ ll
drwxr-xr-x  2 root root 4096 Nov  9 06:14 ./
drwxr-xr-x 10 root root 4096 Nov  9 06:14 ../
-rwxr-xr-x  1 root root 2121 Nov  9 06:14 install-plugin.cmd*
-rwxr-xr-x  1 root root 1924 Nov  9 06:14 install-plugin.sh*
-rwxr-xr-x  1 root root 3087 Nov  9 06:14 seatunnel-cluster.cmd*
-rwxr-xr-x  1 root root 3465 Nov  9 06:14 seatunnel-cluster.sh*
-rwxr-xr-x  1 root root 3555 Nov  9 06:14 seatunnel.cmd*
-rwxr-xr-x  1 root root 3444 Nov  9 06:14 seatunnel.sh*
-rwxr-xr-x  1 root root 2285 Nov  9 06:14 start-seatunnel-flink-13-connector-v2.cmd*
-rwxr-xr-x  1 root root 2220 Nov  9 06:14 start-seatunnel-flink-13-connector-v2.sh*
-rwxr-xr-x  1 root root 2285 Nov  9 06:14 start-seatunnel-flink-15-connector-v2.cmd*
-rwxr-xr-x  1 root root 2220 Nov  9 06:14 start-seatunnel-flink-15-connector-v2.sh*
-rwxr-xr-x  1 root root 2284 Nov  9 06:14 start-seatunnel-spark-2-connector-v2.cmd*
-rwxr-xr-x  1 root root 2219 Nov  9 06:14 start-seatunnel-spark-2-connector-v2.sh*
-rwxr-xr-x  1 root root 2284 Nov  9 06:14 start-seatunnel-spark-3-connector-v2.cmd*
-rwxr-xr-x  1 root root 2219 Nov  9 06:14 start-seatunnel-spark-3-connector-v2.sh*
-rwxr-xr-x  1 root root 1859 Nov  9 06:14 stop-seatunnel-cluster.cmd*
-rwxr-xr-x  1 root root 2066 Nov  9 06:14 stop-seatunnel-cluster.sh*
备份 install-plugin.sh 重命名为install-plugin.sh.bak
sudo cp install-plugin.sh install-plugin.sh.bak
修改文件之前,记得备份。养成好习惯。
修改 install-plugin.sh
PS: 这个步骤是可选择的,暂时不修改也行。
替换脚本中的 ${SEATUNNEL_HOME}/mvnw 为 mvn,即可使用本地mvn,配合阿里云的mvn源,可加速下载。
$ cat install-plugin.sh

#This script is used to download the connector plug-ins required during the running process.
#All are downloaded by default. You can also choose what you need.
#You only need to configure the plug-in name in config/plugin_config.

# get seatunnel home
SEATUNNEL_HOME=$(cd $(dirname $0);cd ../;pwd)

# connector default version is 2.3.4, you can also choose a custom version. eg: 2.1.2:  sh install-plugin.sh 2.1.2
version=2.3.4

if [ -n "$1" ]; then
    version="$1"
fi

echo "Install SeaTunnel connectors plugins, usage version is ${version}"

# create the connectors directory
if [ ! -d ${SEATUNNEL_HOME}/connectors ];
  then
      mkdir ${SEATUNNEL_HOME}/connectors
      echo "create connectors directory"
fi

while read line; do
    first_char=$(echo "$line" | cut -c 1)

    if [ "$first_char" != "-" ] && [ "$first_char" != "#" ] && [ ! -z $first_char ]
        then
                echo "install connector : " $line
                ${SEATUNNEL_HOME}/mvnw dependency:get -DgroupId=org.apache.seatunnel -DartifactId=${line} -Dversion=${version} -Ddest=${SEATUNNEL_HOME}/connectors
    fi

done < ${SEATUNNEL_HOME}/config/plugin_config
配置下载哪些连接器
直接下载的话,会下载所有的连接器,这个没有必要。
配置的地方,脚本中也说明了
#You only need to configure the plug-in name in config/plugin_config.
我们可以在 config/plugin_config 中修改对应的配置文件。
$ cd /home/dh/bigdata/seatunnel-2.3.3/backend/apache-seatunnel-2.3.3/config

$ pwd
/wls/wls81/bigdata/seatunnel-2.3.4/backend/apache-seatunnel-2.3.4/config
默认内容如下:
cat plugin_config

# Don't modify the delimiter " -- ", just select the plugin you need
--connectors-v2--
connector-amazondynamodb
connector-assert
connector-cassandra
connector-cdc-mysql
connector-cdc-mongodb
connector-cdc-sqlserver
connector-clickhouse
connector-datahub
connector-dingtalk
connector-doris
connector-elasticsearch
connector-email
connector-file-ftp
connector-file-hadoop
connector-file-local
connector-file-oss
connector-file-oss-jindo
connector-file-s3
connector-file-sftp
connector-google-sheets
connector-google-firestore
connector-hive
connector-http-base
connector-http-feishu
connector-http-gitlab
connector-http-github
connector-http-jira
connector-http-klaviyo
connector-http-lemlist
connector-http-myhours
connector-http-notion
connector-http-onesignal
connector-http-wechat
connector-hudi
connector-iceberg
connector-influxdb
connector-iotdb
connector-jdbc
connector-kafka
connector-kudu
connector-maxcompute
connector-mongodb
connector-neo4j
connector-openmldb
connector-pulsar
connector-rabbitmq
connector-redis
connector-s3-redshift
connector-sentry
connector-slack
connector-socket
connector-starrocks
connector-tablestore
connector-selectdb-cloud
connector-hbase
我们先做备份,然后修改一下。
$ sudo cp plugin_config plugin_config.bak
sudo vi plugin_config
修改配置,只保留我们需要的,比如只保留:
# Unless required by applicable law or agreed to in writing, software
# distributed under the License is distributed on an "AS IS" BASIS,
# WITHOUT WARRANTIES OR CONDITIONS OF ANY KIND, either express or implied.
# See the License for the specific language governing permissions and
# limitations under the License.
#
#
# This mapping is used to resolve the Jar package name without version (or call artifactId)
#
# corresponding to the module in the user Config, helping SeaTunnel to load the correct Jar package.
# Don't modify the delimiter " -- ", just select the plugin you need
--connectors-v2--
connector-cdc-mysql
connector-cdc-mongodb
connector-elasticsearch
connector-jdbc
connector-kafka
connector-mongodb
connector-neo4j
--end--
这里选择你自己想要的,比如我只选择了自己可能会用到的几个。
执行下载
sudo sh /wls/wls81/bigdata/seatunnel-2.3.4/backend/apache-seatunnel-2.3.4/bin/install-plugin.sh
注意:如果是 ubuntu 的系统,使用 bash install-plugin.sh,或者 ./install-plugin.sh
可能会比较耗时,下载完成的日志:
/wls/wls81/bigdata/seatunnel-2.3.4/backend/apache-seatunnel-2.3.4/bin/install-plugin.sh: 54: Bad substitution
但是看到一个报错?
https://github.com/apache/seatunnel/issues/5380 https://github.com/apache/seatunnel/issues/5630
报错原因,可以参考:https://stackoverflow.com/questions/20615217/bash-bad-substitution
这里我们不要使用 sh,而是使用
cd /wls/wls81/bigdata/seatunnel-2.3.4/backend/apache-seatunnel-2.3.4/bin
./install-plugin.sh
日志如下:
[WARNING] The artifact xml-apis:xml-apis:jar:2.0.2 has been relocated to xml-apis:xml-apis:jar:1.0.b2
[INFO] Resolving org.apache.seatunnel:connector-neo4j:jar:2.3.4 with transitive dependencies
Downloading from central: https://repo.maven.apache.org/maven2/org/apache/seatunnel/connector-neo4j/2.3.4/connector-neo4j-2.3.4.pom
Downloaded from central: https://repo.maven.apache.org/maven2/org/apache/seatunnel/connector-neo4j/2.3.4/connector-neo4j-2.3.4.pom (2.1 kB at 3.3 kB/s)
Downloading from central: https://repo.maven.apache.org/maven2/org/apache/seatunnel/connector-neo4j/2.3.4/connector-neo4j-2.3.4.jar
Downloaded from central: https://repo.maven.apache.org/maven2/org/apache/seatunnel/connector-neo4j/2.3.4/connector-neo4j-2.3.4.jar (5.1 MB at 1.1 MB/s)
[WARNING] destination/dest parameter is deprecated: it will disappear in future version.
[INFO] Copying /root/.m2/repository/org/apache/seatunnel/connector-neo4j/2.3.4/connector-neo4j-2.3.4.jar to /wls/wls81/bigdata/seatunnel-2.3.4/backend/apache-seatunnel-2.3.4/connectors
[WARNING] Notice transitive dependencies won't be copied.
[INFO] ------------------------------------------------------------------------
[INFO] BUILD SUCCESS
[INFO] ------------------------------------------------------------------------
[INFO] Total time:  6.018 s
[INFO] Finished at: 2024-03-29T13:52:27+08:00
[INFO] ------------------------------------------------------------------------
最后的下载效果
$ pwd
/wls/wls81/bigdata/seatunnel-2.3.4/backend/apache-seatunnel-2.3.4/connectors

$ ls
connector-cdc-mongodb-2.3.4.jar  connector-console-2.3.4.jar        connector-fake-2.3.4.jar  connector-kafka-2.3.4.jar    connector-neo4j-2.3.4.jar
connector-cdc-mysql-2.3.4.jar    connector-elasticsearch-2.3.4.jar  connector-jdbc-2.3.4.jar  connector-mongodb-2.3.4.jar  plugin-mapping.properties
我们配置的下载 connector-xxx.jar 都被下载并且拷贝到了 /wls/wls81/bigdata/seatunnel-2.3.4/backend/apache-seatunnel-2.3.4/connectors
这种方式好吃比较省事,一个命令;缺点可能是比较耗时。
jar 包拷贝
当然了,本质上就是把 connector-xxx.jar 下载并且拷贝到 /wls/wls81/bigdata/seatunnel-2.3.4/backend/apache-seatunnel-2.3.4/connectors 目录。
你也可以手动操作:
lib 的依赖
这里还有一些 lib 的依赖需要我们处理一下
默认
$ pwd
/wls/wls81/bigdata/seatunnel-2.3.4/backend/apache-seatunnel-2.3.4/lib

$ ls
seatunnel-hadoop3-3.1.4-uber.jar  seatunnel-transforms-v2.jar
默认只有两个 jar
按照需要下载
比如我们上面用到了 mysql 和 neo4j,你就可以下载放到这里 lib 目录。
1) 命令行
cd /wls/wls81/bigdata/seatunnel-2.3.4/backend/apache-seatunnel-2.3.4/lib
sudo wget https://repo1.maven.org/maven2/com/mysql/mysql-connector-j/8.2.0/mysql-connector-j-8.2.0.jar
sudo wget https://repo1.maven.org/maven2/org/neo4j/driver/neo4j-java-driver/4.4.9/neo4j-java-driver-4.4.9.jar
2) 页面
或者访问
https://mvnrepository.com/artifact/com.mysql/mysql-connector-j/8.2.0
https://mvnrepository.com/artifact/org.neo4j.driver/neo4j-java-driver
下载后,放到对应 lib 目录。
数据确认:
$ ls
mysql-connector-j-8.2.0.jar  neo4j-java-driver-4.4.9.jar  seatunnel-hadoop3-3.1.4-uber.jar  seatunnel-transforms-v2.jar
单机模式测试
我们先测试下单机模式。
#进入安装目录
$   /wls/wls81/bigdata/seatunnel-2.3.4/backend/apache-seatunnel-2.3.4

# 启动服务
$   ./bin/seatunnel.sh --config ./config/v2.batch.config.template -e local
可以看到 fake 的测试数据输出到 console
2024-03-29 14:12:15,296 INFO  [o.a.s.c.s.f.s.FakeSourceReader] [BlockingWorker-TaskGroupLocation{jobId=825975623787741185, pipelineId=1, taskGroupId=30001}] - Closed the bounded fake source
2024-03-29 14:12:15,297 INFO  [.a.s.c.s.c.s.ConsoleSinkWriter] [st-multi-table-sink-writer-1] - subtaskIndex=1  rowIndex=1:  SeaTunnelRow#tableId=fake SeaTunnelRow#kind=INSERT : SpwsF, 114137836
2024-03-29 14:12:15,297 INFO  [.a.s.c.s.c.s.ConsoleSinkWriter] [st-multi-table-sink-writer-1] - subtaskIndex=1  rowIndex=2:  SeaTunnelRow#tableId=fake SeaTunnelRow#kind=INSERT : vRsjT, 1466173946
2024-03-29 14:12:15,297 INFO  [.a.s.c.s.c.s.ConsoleSinkWriter] [st-multi-table-sink-writer-1] - subtaskIndex=1  rowIndex=3:  SeaTunnelRow#tableId=fake SeaTunnelRow#kind=INSERT : bidOK, 859269870
2024-03-29 14:12:15,297 INFO  [.a.s.c.s.c.s.ConsoleSinkWriter] [st-multi-table-sink-writer-1] - subtaskIndex=1  rowIndex=4:  SeaTunnelRow#tableId=fake SeaTunnelRow#kind=INSERT : PSICy, 1218560351
2024-03-29 14:12:15,297 INFO  [.a.s.c.s.c.s.ConsoleSinkWriter] [st-multi-table-sink-writer-1] - subtaskIndex=1  rowIndex=5:  SeaTunnelRow#tableId=fake SeaTunnelRow#kind=INSERT : FFIbk, 944222369
2024-03-29 14:12:15,297 INFO  [.a.s.c.s.c.s.ConsoleSinkWriter] [st-multi-table-sink-writer-1] - subtaskIndex=1  rowIndex=6:  SeaTunnelRow#tableId=fake SeaTunnelRow#kind=INSERT : VeOvE, 1597206251
这个是一个批任务,执行后会直接结束:
2024-03-29 14:12:16,372 INFO  [s.c.s.s.c.ClientExecuteCommand] [main] - Closed SeaTunnel client......
2024-03-29 14:12:16,372 INFO  [c.h.c.LifecycleService        ] [main] - [localhost]:5801 [seatunnel-379010] [5.1] [localhost]:5801 is SHUTTING_DOWN
2024-03-29 14:12:16,374 INFO  [c.h.i.p.i.MigrationManager    ] [hz.main.cached.thread-9] - [localhost]:5801 [seatunnel-379010] [5.1] Shutdown request of Member [localhost]:5801 - b73f25fc-7380-46dc-9b5a-dcd0fd68d224 this is handled
2024-03-29 14:12:16,377 INFO  [c.h.i.i.Node                  ] [main] - [localhost]:5801 [seatunnel-379010] [5.1] Shutting down connection manager...
2024-03-29 14:12:16,378 INFO  [c.h.i.i.Node                  ] [main] - [localhost]:5801 [seatunnel-379010] [5.1] Shutting down node engine...
2024-03-29 14:12:19,393 INFO  [c.h.i.i.NodeExtension         ] [main] - [localhost]:5801 [seatunnel-379010] [5.1] Destroying node NodeExtension.
2024-03-29 14:12:19,394 INFO  [c.h.i.i.Node                  ] [main] - [localhost]:5801 [seatunnel-379010] [5.1] Hazelcast Shutdown is completed in 3020 ms.
2024-03-29 14:12:19,395 INFO  [c.h.c.LifecycleService        ] [main] - [localhost]:5801 [seatunnel-379010] [5.1] [localhost]:5801 is SHUTDOWN
2024-03-29 14:12:19,395 INFO  [s.c.s.s.c.ClientExecuteCommand] [main] - Closed HazelcastInstance ......
2024-03-29 14:12:19,395 INFO  [s.c.s.s.c.ClientExecuteCommand] [main] - Closed metrics executor service ......
2024-03-29 14:12:19,685 INFO  [s.c.s.s.c.ClientExecuteCommand] [ForkJoinPool.commonPool-worker-9] - run shutdown hook because get close signal
集群配置
准备服务器节点
我们现在需要搭建Seatunnel引擎集群,需要准备n台服务器节点, 我这里使用了3台服务器。
比如, 已知我们的3台服务器的IP分别是
192.168.1.110
192.168.1.111
192.168.1.112
我们直接在章2中已经安装部署好的Seatunnel单节点中进行集群的配置,主要的配置修改包含以下几项:
配置
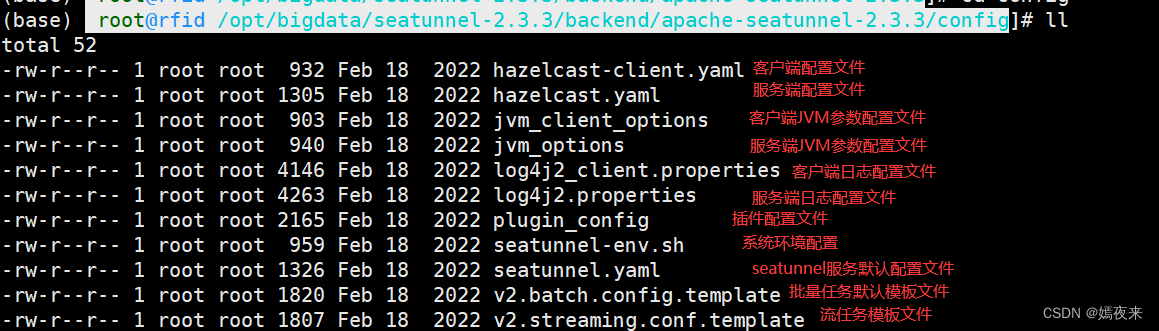
配置文件概览
我们先看一下 seatunnel 中的配置文件
$ pwd
/wls/wls81/bigdata/seatunnel-2.3.4/backend/apache-seatunnel-2.3.4/config

$ ll
total 68
drwxr-xr-x  2 root root 4096 Mar 29 13:42 ./
drwxr-xr-x 10 root root 4096 Nov  9 06:14 ../
-rw-r--r--  1 root root 1020 Nov  9 06:14 hazelcast-client.yaml  # hazelcast 客户端配置
-rw-r--r--  1 root root 1305 Nov  9 06:14 hazelcast.yaml # hazelcast 配置
-rw-r--r--  1 root root  907 Nov  9 06:14 jvm_client_options # jvm 客户端配置
-rw-r--r--  1 root root  961 Nov  9 06:14 jvm_options # jvm 配置
-rw-r--r--  1 root root 4314 Nov  9 06:14 log4j2.properties # log4j2 配置
-rw-r--r--  1 root root 4197 Nov  9 06:14 log4j2_client.properties # log4j2 客户端配置
-rw-r--r--  1 root root 1207 Mar 29 13:42 plugin_config  # 插件配置文件
-rw-r--r--  1 root root 2185 Mar 29 13:39 plugin_config.bak
-rw-r--r--  1 root root 1031 Nov  9 06:14 seatunnel-env.cmd # 环境命令
-rw-r--r--  1 root root  959 Nov  9 06:14 seatunnel-env.sh # 环境命令  spark/flink 的 home,暂时不关心。
-rw-r--r--  1 root root 1326 Nov  9 06:14 seatunnel.yaml # seatunnel 配置
-rw-r--r--  1 root root 1699 Nov  9 06:14 v2.batch.config.template  # 批模式配置模板
-rw-r--r--  1 root root 1702 Nov  9 06:14 v2.streaming.conf.template # 流模式配置模板
seatunnel.yaml
默认值:
seatunnel:
  engine:
    history-job-expire-minutes: 1440
    backup-count: 1
    queue-type: blockingqueue
    print-execution-info-interval: 60
    print-job-metrics-info-interval: 60
    slot-service:
      dynamic-slot: true
    checkpoint:
      interval: 10000
      timeout: 60000
      storage:
        type: hdfs
        max-retained: 3
        plugin-config:
          namespace: /tmp/seatunnel/checkpoint_snapshot
          storage.type: hdfs
          fs.defaultFS: file:///tmp/
这个感觉最坑的就是 checkpoint,会遇到很多问题。比如超时,文件不存在之类的。
checkpoint 的 interval/timeout 单位都是毫秒,int 类型。
文件的存储暂时使用本地文件,使用 HDFS 的话会变得很麻烦。
可以配置为:
seatunnel:
  engine:
    history-job-expire-minutes: 1440
    backup-count: 1
    queue-type: blockingqueue
    print-execution-info-interval: 60
    print-job-metrics-info-interval: 60
    slot-service:
      dynamic-slot: true
    checkpoint:
      interval: 60000
      timeout: 2147483647
      storage:
        type: localfile
        max-retained: 3
        plugin-config:
          namespace: /wls/wls81/bigdata/seatunnel-2.3.4/checkpoint/
然后我们把这个 checkpoint 文件夹也创建一下:
sudo mkdir -p /wls/wls81/bigdata/seatunnel-2.3.4/checkpoint/
hazelcast
hazelcast-client.yaml
原始内容
hazelcast-client:
  cluster-name: seatunnel
  properties:
    hazelcast.logging.type: log4j2
  connection-strategy:
    connection-retry:
      cluster-connect-timeout-millis: 3000
  network:
    cluster-members:
      - localhost:5801
我们可以把这个改为对应的机器 3 个机器 ip
hazelcast-client:
  cluster-name: seatunnel
  properties:
    hazelcast.logging.type: log4j2
  connection-strategy:
    connection-retry:
      cluster-connect-timeout-millis: 3000
  network:
    cluster-members:
      - 192.168.1.110:5801
      - 192.168.1.111:5801
      - 192.168.1.112:5801
hazelcast.yaml
默认值:
hazelcast:
  cluster-name: seatunnel
  network:
    rest-api:
      enabled: true
      endpoint-groups:
        CLUSTER_WRITE:
          enabled: true
        DATA:
          enabled: true
    join:
      tcp-ip:
        enabled: true
        member-list:
          - localhost
    port:
      auto-increment: false
      port: 5801
  properties:
    hazelcast.invocation.max.retry.count: 20
    hazelcast.tcp.join.port.try.count: 30
    hazelcast.logging.type: log4j2
    hazelcast.operation.generic.thread.count: 50
把成员列表给为对应的机器列表:
hazelcast:
  cluster-name: seatunnel
  network:
    rest-api:
      enabled: true
      endpoint-groups:
        CLUSTER_WRITE:
          enabled: true
        DATA:
          enabled: true
    join:
      tcp-ip:
        enabled: true
        member-list:
          - 192.168.1.110:5801
          - 192.168.1.111:5801
          - 192.168.1.112:5801
    port:
      auto-increment: false
      port: 5801
  properties:
    hazelcast.invocation.max.retry.count: 20
    hazelcast.tcp.join.port.try.count: 30
    hazelcast.logging.type: log4j2
    hazelcast.operation.generic.thread.count: 50
不用太关心的
-rw-r--r--  1 root root  907 Nov  9 06:14 jvm_client_options # jvm 客户端配置
-rw-r--r--  1 root root  961 Nov  9 06:14 jvm_options # jvm 配置
-rw-r--r--  1 root root 4314 Nov  9 06:14 log4j2.properties # log4j2 配置
-rw-r--r--  1 root root 4197 Nov  9 06:14 log4j2_client.properties # log4j2 客户端配置
-rw-r--r--  1 root root 2185 Mar 29 13:39 plugin_config.bak
-rw-r--r--  1 root root 1031 Nov  9 06:14 seatunnel-env.cmd # 环境命令
-rw-r--r--  1 root root  959 Nov  9 06:14 seatunnel-env.sh # 环境命令
-rw-r--r--  1 root root 1699 Nov  9 06:14 v2.batch.config.template  # 批模式配置模板
-rw-r--r--  1 root root 1702 Nov  9 06:14 v2.streaming.conf.template # 流模式配置模板
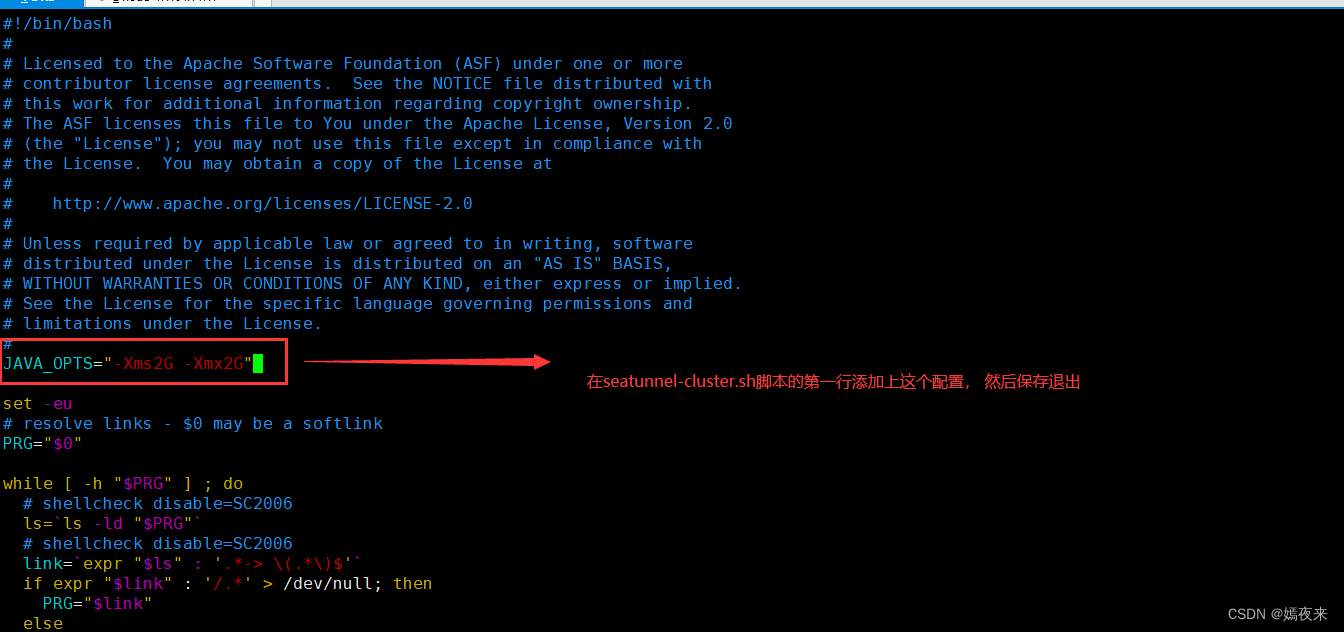
修改JVM参数(可选)
在seatunnel的安装目录,找到 $SEATUNNEL_HOME/bin/seatunnel-cluster.sh

将 JVM 选项添加到$SEATUNNEL_HOME/bin/seatunnel-cluster.sh第一行
JAVA_OPTS=“-Xms2G -Xmx2G”
如果不想这样进行修改,也可以, 不过需要在进行集群启动时,自行增加JVM参数进行启动, 启动命令如下:
也可以用这种方式启动:
nohup sh $SEATUNNEL_HOME/bin/seatunnel-cluster.sh -DJvmOption="-Xms2G -Xmx2G" 2>&1 &
服务包+配置的拷贝
配置改动好以后,把对应的 3 台机器,放上相同的服务包+配置文件。路径全部保持一致。
然后 3 台分别进行下面的启动。
服务的启动
用下面的命令启动服务:
cd /wls/wls81/bigdata/seatunnel-2.3.4/backend/apache-seatunnel-2.3.4/bin

sudo nohup ./seatunnel-cluster.sh  2>&1 &
日志输出到 nohup.out
sudo tail -fn30 nohup.out
服务的确认
这是一个 java 服务。
1) ps
$ ps -ef | grep java
root        5078    5075 10 14:45 pts/3    00:00:11 java -Dseatunnel.config=/wls/wls81/bigdata/seatunnel-2.3.4/backend/apache-seatunnel-2.3.4/config/seatunnel.yaml -Dhazelcast.config=/wls/wls81/bigdata/seatunnel-2.3.4/backend/apache-seatunnel-2.3.4/config/hazelcast.yaml -Dlog4j2.contextSelector=org.apache.logging.log4j.core.async.AsyncLoggerContextSelector -Dlog4j2.configurationFile=/wls/wls81/bigdata/seatunnel-2.3.4/backend/apache-seatunnel-2.3.4/config/log4j2.properties -Dseatunnel.logs.path=/wls/wls81/bigdata/seatunnel-2.3.4/backend/apache-seatunnel-2.3.4/logs -Dseatunnel.logs.file_name=seatunnel-engine-server -Xms2g -Xmx2g -XX:+HeapDumpOnOutOfMemoryError -XX:HeapDumpPath=/tmp/seatunnel/dump/zeta-server -XX:MaxMetaspaceSize=2g -cp /wls/wls81/bigdata/seatunnel-2.3.4/backend/apache-seatunnel-2.3.4/lib/*:/wls/wls81/bigdata/seatunnel-2.3.4/backend/apache-seatunnel-2.3.4/starter/seatunnel-starter.jar org.apache.seatunnel.core.starter.seatunnel.SeaTunnelServer
或者
2) jps
常用命令
查看任务列表
cd /wls/wls81/bigdata/seatunnel-2.3.4/backend/apache-seatunnel-2.3.4/bin
./seatunnel.sh --list
发现此时任务还是空的:
2024-03-29 14:51:26,449 INFO  [.c.i.s.ClientStatisticsService] [main] - Client statistics is enabled with period 5 seconds.
Job ID  Job Name  Job Status  Submit Time              Finished Time
------  --------  ----------  -----------------------  -----------------------

2024-03-29 14:51:26,574 INFO  [c.h.c.LifecycleService        ] [main] - hz.client_1 [seatunnel] [5.1] HazelcastClient 5.1 (20220228 - 21f20e7) is SHUTTING_DOWN
2024-03-29 14:51:26,577 INFO  [.c.i.c.ClientConnectionManager] [main] - hz.client_1 [seatunnel] [5.1] Removed connection to endpoint: [localhost]:5801:650c0728-b4bb-442d-a23c-9ae703fc23f4, connection: ClientConnection{alive=false, connectionId=1, channel=NioChannel{/127.0.0.1:54845->localhost/127.0.0.1:5801}, remoteAddress=[localhost]:5801, lastReadTime=2024-03-29 14:51:26.542, lastWriteTime=2024-03-29 14:51:26.523, closedTime=2024-03-29 14:51:26.575, connected server version=5.1}
2024-03-29 14:51:26,577 INFO  [c.h.c.LifecycleService        ] [main] - hz.client_1 [seatunnel] [5.1] HazelcastClient 5.1 (20220228 - 21f20e7) is CLIENT_DISCONNECTED
2024-03-29 14:51:26,580 INFO  [c.h.c.LifecycleService        ] [main] - hz.client_1 [seatunnel] [5.1] HazelcastClient 5.1 (20220228 - 21f20e7) is SHUTDOWN
2024-03-29 14:51:26,580 INFO  [s.c.s.s.c.ClientExecuteCommand] [main] - Closed SeaTunnel client......
提交批任务
批处理:
nohup ./seatunnel.sh --config .././config/v2.batch.config.template -n batch-job-test > batch-job-test.log 2>&1 &
不知道为啥本地 wsl 一直 报错,估计是日志文件写权限问题:
nohup ./seatunnel.sh --config .././config/v2.batch.config.template -n batch-job-test 2>&1 &
发现这种账户和文件夹不一致时,问题比较多:
看日志报错:
2024-03-29 14:36:39,896 main ERROR Unable to create file /wls/wls81/bigdata/seatunnel-2.3.4/backend/apache-seatunnel-2.3.4/logs/seatunnel-engine-server.log java.io.IOException: Could not create directory /wls/wls81/bigdata/seatunnel-2.3.4/backend/apache-seatunnel-2.3.4/logs
创建一下:
mkdir -p /wls/wls81/bigdata/seatunnel-2.3.4/backend/apache-seatunnel-2.3.4/logs
重新执行;
nohup ./seatunnel.sh --config .././config/v2.batch.config.template -n batch-job-test 2>&1 &
第二次成功
2024-03-29 14:58:55,585 INFO  [o.a.s.e.c.j.ClientJobProxy    ] [main] - Job (825987365632737281) end with state FINISHED
2024-03-29 14:58:55,590 INFO  [s.c.s.s.c.ClientExecuteCommand] [main] -
***********************************************
           Job Statistic Information
***********************************************
Start Time                : 2024-03-29 14:58:54
End Time                  : 2024-03-29 14:58:55
Total Time(s)             :                   1
Total Read Count          :                  32
Total Write Count         :                  32
Total Failed Count        :                   0
***********************************************
此时,再次执行任务的查看,就可以看到我们提交的任务了
2024-03-29 14:59:43,522 INFO  [.c.i.s.ClientStatisticsService] [main] - Client statistics is enabled with period 5 seconds.
Job ID              Job Name        Job Status  Submit Time              Finished Time
------------------  --------------  ----------  -----------------------  -----------------------
825987365632737281  batch-job-test  FINISHED    2024-03-29 14:58:54.228  2024-03-29 14:58:55.578
825986640387244033  batch-job-test  FINISHED    2024-03-29 14:56:01.337  2024-03-29 14:56:02.839
这个批任务的内容:
env {
  # You can set SeaTunnel environment configuration here
  parallelism = 2
  job.mode = "BATCH"
  checkpoint.interval = 10000
}

source {
  # This is a example source plugin **only for test and demonstrate the feature source plugin**
  FakeSource {
    parallelism = 2
    result_table_name = "fake"
    row.num = 16
    schema = {
      fields {
        name = "string"
        age = "int"
      }
    }
  }

  # If you would like to get more information about how to configure SeaTunnel and see full list of source plugins,
  # please go to https://seatunnel.apache.org/docs/category/source-v2
}

sink {
  Console {
  }

  # If you would like to get more information about how to configure SeaTunnel and see full list of sink plugins,
  # please go to https://seatunnel.apache.org/docs/category/sink-v2
}
提交流任务
我们看一下 config 下面的流例子。
内容
$ pwd
/wls/wls81/bigdata/seatunnel-2.3.4/backend/apache-seatunnel-2.3.4/config

$ ls
hazelcast-client.yaml  jvm_client_options  log4j2.properties         plugin_config      seatunnel-env.cmd  seatunnel.yaml      v2.batch.config.template
hazelcast.yaml         jvm_options         log4j2_client.properties  plugin_config.bak  seatunnel-env.sh   seatunnel.yaml_bak  v2.streaming.conf.template
查看 cat v2.streaming.conf.template
env {
  # You can set SeaTunnel environment configuration here
  parallelism = 2
  job.mode = "STREAMING"
  checkpoint.interval = 2000
}

source {
  # This is a example source plugin **only for test and demonstrate the feature source plugin**
  FakeSource {
    parallelism = 2
    result_table_name = "fake"
    row.num = 16
    schema = {
      fields {
        name = "string"
        age = "int"
      }
    }
  }

  # If you would like to get more information about how to configure SeaTunnel and see full list of source plugins,
  # please go to https://seatunnel.apache.org/docs/category/source-v2
}

sink {
  Console {
  }

  # If you would like to get more information about how to configure SeaTunnel and see full list of sink plugins,
  # please go to https://seatunnel.apache.org/docs/category/sink-v2
}
提交流任务
cd /wls/wls81/bigdata/seatunnel-2.3.4/backend/apache-seatunnel-2.3.4/bin
nohup ./seatunnel.sh --config .././config/v2.streaming.conf.template  -n streaming-job-test > /home/dh/streaming-job-test.log 2>&1 &
日志在 /home/dh/streaming-job-test.log 查看,启动日志如下:
2024-03-29 15:05:02,286 INFO  [o.a.s.e.c.j.ClientJobProxy    ] [main] - Submit job finished, job id: 825988908964642817, job name: streaming-job-test
2024-03-29 15:05:02,293 WARN  [o.a.s.e.c.j.JobMetricsRunner  ] [job-metrics-runner-825988908964642817] - Failed to get job metrics summary, it maybe first-run

2024-03-29 15:06:02,305 INFO  [o.a.s.e.c.j.JobMetricsRunner  ] [job-metrics-runner-825988908964642817] -
***********************************************
           Job Progress Information
***********************************************
Job Id                    :  825988908964642817
Read Count So Far         :                  32
Write Count So Far        :                  32
Average Read Count        :                 0/s
Average Write Count       :                 0/s
Last Statistic Time       : 2024-03-29 15:05:02
Current Statistic Time    : 2024-03-29 15:06:02
***********************************************
查看任务:
./seatunnel.sh --list
如下:
2024-03-29 15:07:52,446 INFO  [.c.i.s.ClientStatisticsService] [main] - Client statistics is enabled with period 5 seconds.
Job ID              Job Name            Job Status  Submit Time              Finished Time
------------------  ------------------  ----------  -----------------------  -----------------------
825988908964642817  streaming-job-test  RUNNING     2024-03-29 15:05:02.258
825987365632737281  batch-job-test      FINISHED    2024-03-29 14:58:54.228  2024-03-29 14:58:55.578
825986640387244033  batch-job-test      FINISHED    2024-03-29 14:56:01.337  2024-03-29 14:56:02.839
任务的保存与恢复
如果我们希望保存一下服务,比如想重启服务之类的。
可以分为 2 步:
1)指定 jobId 保存任务
./seatunnel.sh -s 825988908964642817
此时,发生了什么呢?内容被保存在 checkpoint 目录下。
看一下任务状态:
825988908964642817  streaming-job-test  SAVEPOINT_DONE  2024-03-29 15:05:02.258  2024-03-29 15:13:36.435
825987365632737281  batch-job-test      FINISHED        2024-03-29 14:58:54.228  2024-03-29 14:58:55.578
825986640387244033  batch-job-test      FINISHED        2024-03-29 14:56:01.337  2024-03-29 14:56:02.839
看一下运行日志:
tail -fn60 /home/dh/streaming-job-test.log
结果如下:
***********************************************
           Job Statistic Information
***********************************************
Start Time                : 2024-03-29 15:05:02
End Time                  : 2024-03-29 15:13:36
Total Time(s)             :                 514
Total Read Count          :                  32
Total Write Count         :                  32
Total Failed Count        :                   0
***********************************************

2024-03-29 15:13:36,447 INFO  [c.h.c.LifecycleService        ] [main] - hz.client_1 [seatunnel] [5.1] HazelcastClient 5.1 (20220228 - 21f20e7) is SHUTTING_DOWN
2024-03-29 15:13:36,450 INFO  [.c.i.c.ClientConnectionManager] [main] - hz.client_1 [seatunnel] [5.1] Removed connection to endpoint: [localhost]:5801:650c0728-b4bb-442d-a23c-9ae703fc23f4, connection: ClientConnection{alive=false, connectionId=1, channel=NioChannel{/127.0.0.1:55041->localhost/127.0.0.1:5801}, remoteAddress=[localhost]:5801, lastReadTime=2024-03-29 15:13:36.445, lastWriteTime=2024-03-29 15:13:36.444, closedTime=2024-03-29 15:13:36.449, connected server version=5.1}
2024-03-29 15:13:36,450 INFO  [c.h.c.LifecycleService        ] [main] - hz.client_1 [seatunnel] [5.1] HazelcastClient 5.1 (20220228 - 21f20e7) is CLIENT_DISCONNECTED
2024-03-29 15:13:36,452 INFO  [c.h.c.LifecycleService        ] [main] - hz.client_1 [seatunnel] [5.1] HazelcastClient 5.1 (20220228 - 21f20e7) is SHUTDOWN
2024-03-29 15:13:36,452 INFO  [s.c.s.s.c.ClientExecuteCommand] [main] - Closed SeaTunnel client......
2024-03-29 15:13:36,452 INFO  [s.c.s.s.c.ClientExecuteCommand] [main] - Closed metrics executor service ......
2024-03-29 15:13:36,453 INFO  [s.c.s.s.c.ClientExecuteCommand] [ForkJoinPool.commonPool-worker-11] - run shutdown hook because get close signal
此时任务已经被关闭了。
2)恢复执行任务
nohup ./seatunnel.sh --config .././config/v2.streaming.conf.template -n streaming-job-test -r 825988908964642817 > /home/dh/streaming-job-test.log 2>&1 &
我们通过 -r 指定恢复的 jobId
查看任务:
./seatunnel.sh --list

2024-03-29 15:19:20,135 INFO  [.c.i.s.ClientStatisticsService] [main] - Client statistics is enabled with period 5 seconds.
Job ID              Job Name            Job Status  Submit Time              Finished Time
------------------  ------------------  ----------  -----------------------  -----------------------
825988908964642817  streaming-job-test  RUNNING     2024-03-29 15:19:03.767
825987365632737281  batch-job-test      FINISHED    2024-03-29 14:58:54.228  2024-03-29 14:58:55.578
825986640387244033  batch-job-test      FINISHED    2024-03-29 14:56:01.337  2024-03-29 14:56:02.839
任务恢复运行。
查看日志:
tail -fn60 /home/dh/streaming-job-test.log
取消任务
如果我们不想执行这个流任务了,可以取消。
./seatunnel.sh -can 825988908964642817
查看任务状态:
./seatunnel.sh --list

2024-03-29 15:22:44,850 INFO  [.c.i.s.ClientStatisticsService] [main] - Client statistics is enabled with period 5 seconds.
Job ID              Job Name            Job Status  Submit Time              Finished Time
------------------  ------------------  ----------  -----------------------  -----------------------
825988908964642817  streaming-job-test  CANCELED    2024-03-29 15:19:03.767  2024-03-29 15:22:18.836
825987365632737281  batch-job-test      FINISHED    2024-03-29 14:58:54.228  2024-03-29 14:58:55.578
825986640387244033  batch-job-test      FINISHED    2024-03-29 14:56:01.337  2024-03-29 14:56:02.839
参考资料
https://blog.csdn.net/qq_41865652/article/details/134574104
https://avoid.overfit.cn/post/ac32f113f8b8490d980ed761122c4237
更多学习
更多实时资讯,前沿技术,生活趣事。尽在【老马啸西风】
交流社群:[交流群信息](https://mp.weixin.qq.com/s/rkSvXxiiLGjl3S-ZOZCr0Q)
