环境准备
CentOS 7.6.18_x86_64 JDK >= 1.8.151 Maven >= 3.6.3 Apache Seatunnel ==2.3.3 Apache Seatunnel Web == 1.0.0 MySQL >= 5.7.28
windows WSL 安装实战笔记
jdk
dh@d:~$ java -version
Command 'java' not found, but can be installed with:
sudo apt install openjdk-11-jre-headless  # version 11.0.20.1+1-0ubuntu1~22.04, or
sudo apt install default-jre              # version 2:1.11-72build2
sudo apt install openjdk-17-jre-headless  # version 17.0.8.1+1~us1-0ubuntu1~22.04
sudo apt install openjdk-18-jre-headless  # version 18.0.2+9-2~22.04
sudo apt install openjdk-19-jre-headless  # version 19.0.2+7-0ubuntu3~22.04
sudo apt install openjdk-8-jre-headless   # version 8u382-ga-1~22.04.1
安装一下
sudo apt install openjdk-8-jre-headless
$ java -version
openjdk version "1.8.0_392"
OpenJDK Runtime Environment (build 1.8.0_392-8u392-ga-1~22.04-b08)
OpenJDK 64-Bit Server VM (build 25.392-b08, mixed mode)
配置 JAVA_HOME
update-alternatives --list java
如下:
/usr/lib/jvm/java-8-openjdk-amd64/jre/bin/java
则对应的 java home 为:/usr/lib/jvm/java-8-openjdk-amd64/jre
我们修改一下 /etc/profile
sudo vi /etc/profile
添加对应的 java_home 信息:
export JAVA_HOME=/usr/lib/jvm/java-8-openjdk-amd64/jre
export SEATUNNEL_HOME=/home/dh/bigdata/seatunnel-2.3.3/backend/apache-seatunnel-2.3.3
export PATH=$SEATUNNEL_HOME/bin:$JAVA_HOME/bin:$PATH
刷新配置:
source /etc/profile
测试:
$ echo $JAVA_HOME
/usr/lib/jvm/java-8-openjdk-amd64/jre
maven 安装
mvn -v

$ mvn -v
Apache Maven 3.5.4 (1edded0938998edf8bf061f1ceb3cfdeccf443fe; 2018-06-18T02:33:14+08:00)
Maven home: /mnt/d/tool/maven/apache-maven-3.5.4
Java version: 1.8.0_392, vendor: Private Build, runtime: /usr/lib/jvm/java-8-openjdk-amd64/jre
Default locale: en, platform encoding: UTF-8
OS name: "linux", version: "5.15.133.1-microsoft-standard-wsl2", arch: "amd64", family: "unix"
WSL 内核版本
dh@d:~$ uname -r
5.15.133.1-microsoft-standard-WSL2
dh@d:~$ uname -a
Linux d 5.15.133.1-microsoft-standard-WSL2 #1 SMP Thu Oct 5 21:02:42 UTC 2023 x86_64 x86_64 x86_64 GNU/Linux
创建安装软件目录
创建+下载 backend
创建seatunnel后端服务安装目录
# 创建文件夹
mkdir -p /home/dh/bigdata/seatunnel-2.3.3/backend
cd /home/dh/bigdata/seatunnel-2.3.3/backend

# 获取解压
wget https://dlcdn.apache.org/seatunnel/2.3.3/apache-seatunnel-2.3.3-bin.tar.gz
tar -zxf apache-seatunnel-2.3.3-bin.tar.gz

# 重命名(这个可选,解压之后发现就是 apache-seatunnel-2.3.3)
mv apache-seatunnel-2.3.3-bin apache-seatunnel-2.3.3
创建+下载 web
创建 seatunnel 前端服务安装目录
# 创建文件夹
mkdir -p /home/dh/bigdata/seatunnel-2.3.3/web
cd /home/dh/bigdata/seatunnel-2.3.3/web

# 获取解压
wget https://dlcdn.apache.org/seatunnel/seatunnel-web/1.0.0/apache-seatunnel-web-1.0.0-bin.tar.gz
tar -zxf apache-seatunnel-web-1.0.0-bin.tar.gz

# 重命名
mv apache-seatunnel-web-1.0.0-bin apache-seatunnel-web-1.0.0
配置环境变量
配置 /etc/profile,添加内容:
直接 vi 修改
sudo vi /etc/profile
加在末尾。
export SEATUNNEL_HOME=/home/dh/bigdata/seatunnel-2.3.3/backend/apache-seatunnel-2.3.3
export PATH=$SEATUNNEL_HOME/bin:$PATH
配置立刻生效:
source /etc/profile
安装 backend 后端
创建需要的文件夹
$ pwd
/home/dh/bigdata/seatunnel-2.3.3/backend/apache-seatunnel-2.3.3/connectors

$ ls
plugin-mapping.properties  seatunnel
看安装说需要,但实际感觉目前用不到,我们先创建一下。
mkdir -p /home/dh/bigdata/seatunnel-2.3.3/backend/apache-seatunnel-2.3.3/connectors/flink
mkdir -p /home/dh/bigdata/seatunnel-2.3.3/backend/apache-seatunnel-2.3.3/connectors/flink-sql
mkdir -p /home/dh/bigdata/seatunnel-2.3.3/backend/apache-seatunnel-2.3.3/connectors/spark
执行完成后:
$ ls
flink  flink-sql  plugin-mapping.properties  seatunnel  spark
默认启动驱动
首先看一下 connector 驱动包有哪些东西:
cd /home/dh/bigdata/seatunnel-2.3.3/backend/apache-seatunnel-2.3.3/connectors

$ ll
total 20
drwxr-xr-x  3 dh dh 4096 Jan  9 13:56 ./
drwxr-xr-x 10 dh dh 4096 Feb 18  2022 ../
-rw-r--r--  1 dh dh 5376 Feb 18  2022 plugin-mapping.properties
drwxr-xr-x  2 dh dh 4096 Jan  9 13:56 seatunnel/

$ cd seatunnel/
dh@d:~/bigdata/seatunnel-2.3.3/backend/apache-seatunnel-2.3.3/connectors/seatunnel$ ls
connector-console-2.3.3.jar  connector-fake-2.3.3.jar
安装seatunnel过程中,解压文件后官方默认提供的connector的jar包只有2个,要想连接mysql,oracle,SqlServer,hive,kafka,clickhouse,doris等时,还需下载对应的jar包。
下载插件
使用本地Maven加速下载connector相关jar包
seatunnel下载connector的jar时,使用mvnw来下载jar包,默认是从https://repo.maven.apache.org 下载,速度及其缓慢。
我们可以改成自己在linux系统上安装的mvn,配置阿里云远程仓库地址,从阿里云mvn源下载会快很多, 下面教大家如何进行修改。
$ cd /home/dh/bigdata/seatunnel-2.3.3/backend/apache-seatunnel-2.3.3/bin

$ pwd
/home/dh/bigdata/seatunnel-2.3.3/backend/apache-seatunnel-2.3.3/bin

$ ll
total 40
drwxr-xr-x  2 dh dh 4096 Feb 18  2022 ./
drwxr-xr-x 10 dh dh 4096 Feb 18  2022 ../
-rwxr-xr-x  1 dh dh 2328 Feb 18  2022 install-plugin.sh*
-rwxr-xr-x  1 dh dh 3381 Feb 18  2022 seatunnel-cluster.sh*
-rwxr-xr-x  1 dh dh 3119 Feb 18  2022 seatunnel.sh*
-rwxr-xr-x  1 dh dh 2220 Feb 18  2022 start-seatunnel-flink-13-connector-v2.sh*
-rwxr-xr-x  1 dh dh 2220 Feb 18  2022 start-seatunnel-flink-15-connector-v2.sh*
-rwxr-xr-x  1 dh dh 2219 Feb 18  2022 start-seatunnel-spark-2-connector-v2.sh*
-rwxr-xr-x  1 dh dh 2219 Feb 18  2022 start-seatunnel-spark-3-connector-v2.sh*
-rwxr-xr-x  1 dh dh 2066 Feb 18  2022 stop-seatunnel-cluster.sh*
备份 install-plugin.sh 重命名为install-plugin.sh.bak
cp install-plugin.sh install-plugin.sh.bak
修改文件之前,记得备份。养成好习惯。
修改 install-plugin.sh
替换脚本中的 ${SEATUNNEL_HOME}/mvnw 为 mvn,即可使用本地mvn,配合阿里云的mvn源,可加速下载。
$ cat install-plugin.sh
#!/bin/bash

#This script is used to download the connector plug-ins required during the running process.
#All are downloaded by default. You can also choose what you need.
#You only need to configure the plug-in name in config/plugin_config.

# get seatunnel home
SEATUNNEL_HOME=$(cd $(dirname $0);cd ../;pwd)

# connector default version is 2.3.3, you can also choose a custom version. eg: 2.1.2:  sh install-plugin.sh 2.1.2
version=2.3.3

if [ -n "$1" ]; then
    version="$1"
fi

echo "Install hadoop shade jar, usage version is ${version}"

${SEATUNNEL_HOME}/mvnw dependency:get -DgroupId=org.apache.seatunnel -Dclassifier=optional -DartifactId=seatunnel-hadoop3-3.1.4-uber -Dversion=${version} -Ddest=${SEATUNNEL_HOME}/lib

echo "Install SeaTunnel connectors plugins, usage version is ${version}"

# create the connectors directory
if [ ! -d ${SEATUNNEL_HOME}/connectors ];
  then
      mkdir ${SEATUNNEL_HOME}/connectors
      echo "create connectors directory"
fi

# create the seatunnel connectors directory (for v2)
if [ ! -d ${SEATUNNEL_HOME}/connectors/seatunnel ];
  then
      mkdir ${SEATUNNEL_HOME}/connectors/seatunnel
      echo "create seatunnel connectors directory"
fi

while read line; do
    if  [ ${line:0:1} != "-" ] && [ ${line:0:1} != "#" ]
        then
                echo "install connector : " $line
                ${SEATUNNEL_HOME}/mvnw dependency:get -DgroupId=org.apache.seatunnel -DartifactId=${line} -Dversion=${version} -Ddest=${SEATUNNEL_HOME}/connectors/seatunnel
    fi
配置下载哪些连接器
直接下载的话,会下载所有的连接器,这个没有必要。
配置的地方,脚本中也说明了
#You only need to configure the plug-in name in config/plugin_config.
cd /home/dh/bigdata/seatunnel-2.3.3/backend/apache-seatunnel-2.3.3/config
默认内容如下:
cat plugin_config

# Don't modify the delimiter " -- ", just select the plugin you need
--connectors-v2--
connector-amazondynamodb
connector-assert
connector-cassandra
connector-cdc-mysql
connector-cdc-mongodb
connector-cdc-sqlserver
connector-clickhouse
connector-datahub
connector-dingtalk
connector-doris
connector-elasticsearch
connector-email
connector-file-ftp
connector-file-hadoop
connector-file-local
connector-file-oss
connector-file-oss-jindo
connector-file-s3
connector-file-sftp
connector-google-sheets
connector-google-firestore
connector-hive
connector-http-base
connector-http-feishu
connector-http-gitlab
connector-http-github
connector-http-jira
connector-http-klaviyo
connector-http-lemlist
connector-http-myhours
connector-http-notion
connector-http-onesignal
connector-http-wechat
connector-hudi
connector-iceberg
connector-influxdb
connector-iotdb
connector-jdbc
connector-kafka
connector-kudu
connector-maxcompute
connector-mongodb
connector-neo4j
connector-openmldb
connector-pulsar
connector-rabbitmq
connector-redis
connector-s3-redshift
connector-sentry
connector-slack
connector-socket
connector-starrocks
connector-tablestore
connector-selectdb-cloud
connector-hbase
我们先做备份,然后修改一下。
$ cp plugin_config plugin_config.bak
vi plugin_config 修改配置,只保留我们需要的,比如只保留:
# Unless required by applicable law or agreed to in writing, software
# distributed under the License is distributed on an "AS IS" BASIS,
# WITHOUT WARRANTIES OR CONDITIONS OF ANY KIND, either express or implied.
# See the License for the specific language governing permissions and
# limitations under the License.
#
#
# This mapping is used to resolve the Jar package name without version (or call artifactId)
#
# corresponding to the module in the user Config, helping SeaTunnel to load the correct Jar package.
# Don't modify the delimiter " -- ", just select the plugin you need
--connectors-v2--
connector-cdc-mysql
connector-cdc-mongodb
connector-elasticsearch
connector-jdbc
connector-kafka
connector-mongodb
connector-neo4j
执行下载
sh /home/dh/bigdata/seatunnel-2.3.3/backend/apache-seatunnel-2.3.3/bin/install-plugin.sh
注意:如果是 ubuntu 的系统,使用 bash install-plugin.sh,或者 ./install-plugin.sh
可能会比较耗时,下载完成的日志:
Downloaded from central: https://repo.maven.apache.org/maven2/org/apache/seatunnel/seatunnel-hadoop3-3.1.4-uber/2.3.3/seatunnel-hadoop3-3.1.4-uber-2.3.3-optional.jar (42 MB at 433 kB/s)
[WARNING] destination/dest parameter is deprecated: it will disappear in future version.
[INFO] Copying /home/dh/.m2/repository/org/apache/seatunnel/seatunnel-hadoop3-3.1.4-uber/2.3.3/seatunnel-hadoop3-3.1.4-uber-2.3.3-optional.jar to /home/dh/bigdata/seatunnel-2.3.3/backend/apache-seatunnel-2.3.3/lib
[WARNING] Notice transitive dependencies won't be copied.
[INFO] ------------------------------------------------------------------------
[INFO] BUILD SUCCESS
[INFO] ------------------------------------------------------------------------
[INFO] Total time:  05:27 min
[INFO] Finished at: 2024-01-09T14:43:34+08:00
[INFO] ------------------------------------------------------------------------
Install SeaTunnel connectors plugins, usage version is 2.3.3

/home/dh/bigdata/seatunnel-2.3.3/backend/apache-seatunnel-2.3.3/bin/install-plugin.sh: 54: Bad substitution
但是看到一个报错?
https://github.com/apache/seatunnel/issues/5380 https://github.com/apache/seatunnel/issues/5630
报错原因,可以参考:https://stackoverflow.com/questions/20615217/bash-bad-substitution
这里我们不要使用 sh,而是使用
cd /home/dh/bigdata/seatunnel-2.3.3/backend/apache-seatunnel-2.3.3/bin/
./install-plugin.sh
日志如下:
[INFO] Copying /home/dh/.m2/repository/org/apache/seatunnel/connector-mongodb/2.3.3/connector-mongodb-2.3.3.jar to /home/dh/bigdata/seatunnel-2.3.3/backend/apache-seatunnel-2.3.3/connectors/seatunnel
[WARNING] Notice transitive dependencies won't be copied.
[INFO] ------------------------------------------------------------------------
[INFO] BUILD SUCCESS
[INFO] ------------------------------------------------------------------------
[INFO] Total time:  3.646 s
[INFO] Finished at: 2024-01-09T14:54:29+08:00
[INFO] ------------------------------------------------------------------------
install connector :  connector-neo4j
Warning: JAVA_HOME environment variable is not set.
[INFO] Scanning for projects...
[INFO]
[INFO] ------------------< org.apache.maven:standalone-pom >-------------------
[INFO] Building Maven Stub Project (No POM) 1
[INFO] --------------------------------[ pom ]---------------------------------
[INFO]
[INFO] --- maven-dependency-plugin:2.8:get (default-cli) @ standalone-pom ---
[WARNING] The artifact xml-apis:xml-apis:jar:2.0.2 has been relocated to xml-apis:xml-apis:jar:1.0.b2
[INFO] Resolving org.apache.seatunnel:connector-neo4j:jar:2.3.3 with transitive dependencies
Downloading from central: https://repo.maven.apache.org/maven2/org/apache/seatunnel/connector-neo4j/2.3.3/connector-neo4j-2.3.3.pom
Downloaded from central: https://repo.maven.apache.org/maven2/org/apache/seatunnel/connector-neo4j/2.3.3/connector-neo4j-2.3.3.pom (2.1 kB at 2.9 kB/s)
Downloading from central: https://repo.maven.apache.org/maven2/org/apache/seatunnel/connector-neo4j/2.3.3/connector-neo4j-2.3.3.jar
Downloaded from central: https://repo.maven.apache.org/maven2/org/apache/seatunnel/connector-neo4j/2.3.3/connector-neo4j-2.3.3.jar (5.1 MB at 1.2 MB/s)
[WARNING] destination/dest parameter is deprecated: it will disappear in future version.
[INFO] Copying /home/dh/.m2/repository/org/apache/seatunnel/connector-neo4j/2.3.3/connector-neo4j-2.3.3.jar to /home/dh/bigdata/seatunnel-2.3.3/backend/apache-seatunnel-2.3.3/connectors/seatunnel
[WARNING] Notice transitive dependencies won't be copied.
[INFO] ------------------------------------------------------------------------
[INFO] BUILD SUCCESS
[INFO] ------------------------------------------------------------------------
[INFO] Total time:  5.802 s
[INFO] Finished at: 2024-01-09T14:54:35+08:00
[INFO] ------------------------------------------------------------------------
jar 包拷贝
$   cd /home/dh/bigdata/seatunnel-2.3.3/backend/apache-seatunnel-2.3.3/connectors/seatunnel
$   ll

drwxr-xr-x 2 dh dh     4096 Jan  9 14:54 ./
drwxr-xr-x 6 dh dh     4096 Jan  9 14:18 ../
-rw-r--r-- 1 dh dh 29532610 Jan  9 14:53 connector-cdc-mongodb-2.3.3.jar
-rw-r--r-- 1 dh dh 29508120 Jan  9 14:53 connector-cdc-mysql-2.3.3.jar
-rw-r--r-- 1 dh dh    52297 Feb 18  2022 connector-console-2.3.3.jar
-rw-r--r-- 1 dh dh  5485372 Jan  9 14:54 connector-elasticsearch-2.3.3.jar
-rw-r--r-- 1 dh dh   162972 Feb 18  2022 connector-fake-2.3.3.jar
-rw-r--r-- 1 dh dh   402984 Jan  9 14:54 connector-jdbc-2.3.3.jar
-rw-r--r-- 1 dh dh 15953189 Jan  9 14:54 connector-kafka-2.3.3.jar
-rw-r--r-- 1 dh dh  2456029 Jan  9 14:54 connector-mongodb-2.3.3.jar
-rw-r--r-- 1 dh dh  5076194 Jan  9 14:54 connector-neo4j-2.3.3.jar
这个下面的 jar 包,需要拷贝到 /home/dh/bigdata/seatunnel-2.3.3/backend/apache-seatunnel-2.3.3/lib
$ cp /home/dh/bigdata/seatunnel-2.3.3/backend/apache-seatunnel-2.3.3/connectors/seatunnel/* /home/dh/bigdata/seatunnel-2.3.3/backend/apache-seatunnel-2.3.3/lib
确认:
$   cd /home/dh/bigdata/seatunnel-2.3.3/backend/apache-seatunnel-2.3.3/lib
$   ll

total 128716
drwxr-xr-x  2 dh dh     4096 Jan  9 14:59 ./
drwxr-xr-x 10 dh dh     4096 Feb 18  2022 ../
-rw-r--r--  1 dh dh 29532610 Jan  9 14:59 connector-cdc-mongodb-2.3.3.jar
-rw-r--r--  1 dh dh 29508120 Jan  9 14:59 connector-cdc-mysql-2.3.3.jar
-rw-r--r--  1 dh dh    52297 Jan  9 14:59 connector-console-2.3.3.jar
-rw-r--r--  1 dh dh  5485372 Jan  9 14:59 connector-elasticsearch-2.3.3.jar
-rw-r--r--  1 dh dh   162972 Jan  9 14:59 connector-fake-2.3.3.jar
-rw-r--r--  1 dh dh   402984 Jan  9 14:59 connector-jdbc-2.3.3.jar
-rw-r--r--  1 dh dh 15953189 Jan  9 14:59 connector-kafka-2.3.3.jar
-rw-r--r--  1 dh dh  2456029 Jan  9 14:59 connector-mongodb-2.3.3.jar
-rw-r--r--  1 dh dh  5076194 Jan  9 14:59 connector-neo4j-2.3.3.jar
-rw-r--r--  1 dh dh 42110549 Jan  9 14:43 seatunnel-hadoop3-3.1.4-uber-2.3.3-optional.jar
-rw-r--r--  1 dh dh  1032927 Feb 18  2022 seatunnel-transforms-v2.jar
方式2:手动下载
我们操作了这么多,只是为了下载驱动包而已。
也可以手动下载对应的包,分别放在上面 2 个目录中。
PS:不过这里的 maven 其他依赖包怎么处理?
启动验证
#进入安装目录
$   cd /home/dh/bigdata/seatunnel-2.3.3/backend/apache-seatunnel-2.3.3

# 启动服务
$   ./bin/seatunnel.sh --config ./config/v2.batch.config.template
测试日志,个人理解应该会自动关闭?
2024-01-09 15:03:04,287 INFO  org.apache.seatunnel.engine.server.dag.physical.PhysicalPlan - Job SeaTunnel_Job (796997374521114625) end with state FINISHED
2024-01-09 15:03:04,300 INFO  org.apache.seatunnel.engine.client.job.ClientJobProxy - Job (796997374521114625) end with state FINISHED
2024-01-09 15:03:04,319 INFO  org.apache.seatunnel.core.starter.seatunnel.command.ClientExecuteCommand -
***********************************************
           Job Statistic Information
***********************************************
Start Time                : 2024-01-09 15:03:01
End Time                  : 2024-01-09 15:03:04
Total Time(s)             :                   2
Total Read Count          :                  32
Total Write Count         :                  32
Total Failed Count        :                   0
***********************************************

...

localhost]:5801 - 4d80136b-cae0-4664-8f6c-0d85207637a3 this is handled
2024-01-09 15:03:04,332 INFO  com.hazelcast.instance.impl.Node - [localhost]:5801 [seatunnel-72264] [5.1] Shutting down connection manager...
2024-01-09 15:03:04,333 INFO  com.hazelcast.instance.impl.Node - [localhost]:5801 [seatunnel-72264] [5.1] Shutting down node engine...
2024-01-09 15:03:06,099 INFO  com.hazelcast.instance.impl.NodeExtension - [localhost]:5801 [seatunnel-72264] [5.1] Destroying node NodeExtension.
2024-01-09 15:03:06,099 INFO  com.hazelcast.instance.impl.Node - [localhost]:5801 [seatunnel-72264] [5.1] Hazelcast Shutdown is completed in 1772 ms.
2024-01-09 15:03:06,100 INFO  com.hazelcast.core.LifecycleService - [localhost]:5801 [seatunnel-72264] [5.1] [localhost]:5801 is SHUTDOWN
2024-01-09 15:03:06,100 INFO  org.apache.seatunnel.core.starter.seatunnel.command.ClientExecuteCommand - Closed HazelcastInstance ......
2024-01-09 15:03:06,100 INFO  org.apache.seatunnel.core.starter.seatunnel.command.ClientExecuteCommand - Closed metrics executor service ......
2024-01-09 15:03:06,102 INFO  org.apache.seatunnel.core.starter.seatunnel.command.ClientExecuteCommand - run shutdown hook because get close signal
服务启动
#进入安装目录
$   cd /home/dh/bigdata/seatunnel-2.3.3/backend/apache-seatunnel-2.3.3

# 启动服务
$   nohup bash bin/seatunnel-cluster.sh 2>&1 &
日志查看在
tail -f /home/dh/bigdata/seatunnel-2.3.3/backend/apache-seatunnel-2.3.3/logs/seatunnel-engine-server.log
启动成功的日志:
2024-01-09 15:05:30,262 INFO  org.apache.seatunnel.engine.server.resourcemanager.AbstractResourceManager - Init ResourceManager
2024-01-09 15:05:30,262 INFO  org.apache.seatunnel.engine.server.resourcemanager.AbstractResourceManager - initWorker...
2024-01-09 15:05:30,262 INFO  org.apache.seatunnel.engine.server.resourcemanager.AbstractResourceManager - initWorker live nodes: [[localhost]:5801]
2024-01-09 15:05:30,263 INFO  org.apache.seatunnel.engine.server.resourcemanager.AbstractResourceManager - registerWorker: {[localhost]:5801=WorkerProfile(address=[localhost]:5801, profile=ResourceProfile{cpu=CPU{core=0}, heapMemory=Memory{bytes=2058354688}}, unassignedResource=ResourceProfile{cpu=CPU{core=0}, heapMemory=Memory{bytes=2058354688}}, assignedSlots=[], unassignedSlots=[])}
2024-01-09 15:06:25,258 INFO  org.apache.seatunnel.engine.server.CoordinatorService - [localhost]:5801 [seatunnel] [5.1]
***********************************************
     CoordinatorService Thread Pool Status
***********************************************
activeCount               :                   0
corePoolSize              :                   0
maximumPoolSize           :          2147483647
poolSize                  :                   0
completedTaskCount        :                   0
taskCount                 :                   0
***********************************************

2024-01-09 15:06:25,263 INFO  org.apache.seatunnel.engine.server.CoordinatorService - [localhost]:5801 [seatunnel] [5.1]
***********************************************
                Job info detail
***********************************************
createdJobCount           :                   0
scheduledJobCount         :                   0
runningJobCount           :                   0
failingJobCount           :                   0
failedJobCount            :                   0
cancellingJobCount        :                   0
canceledJobCount          :                   0
finishedJobCount          :                   0
restartingJobCount        :                   0
suspendedJobCount         :                   0
reconcilingJobCount       :                   0
***********************************************
必须保证Apache SeaTunnel的Server正常运行,Web端服务才能正常运行。
3. 安装 web 端
3.1 安装配置Seatunnel引擎集群
在SeaTunnel的Web端机器上需要安装SeaTunnel客户端,如果服务端与Web端在同一台机器,则可直接跳过这个步骤。
本文档的安装过程中,Seatunnel服务端和web是安装在同一台机器上, 所以直接跳过此步安装步骤。
这里所说的Seatunnel引擎客户端其实就是我们章2中安装的Seatunnel服务端,下面讲解一下如何进行Seatunnel集群的安装配置
3.1.1.准备服务器节点
我们现在需要搭建Seatunnel引擎集群,需要准备 n 台服务器节点, 我这里使用了3台服务器。
比如, 已知我们的3台服务器的IP分别是
192.168.1.110
192.168.1.111
192.168.1.112
我们直接在章2中已经安装部署好的Seatunnel单节点中进行集群的配置,主要的配置修改包含以下几项:
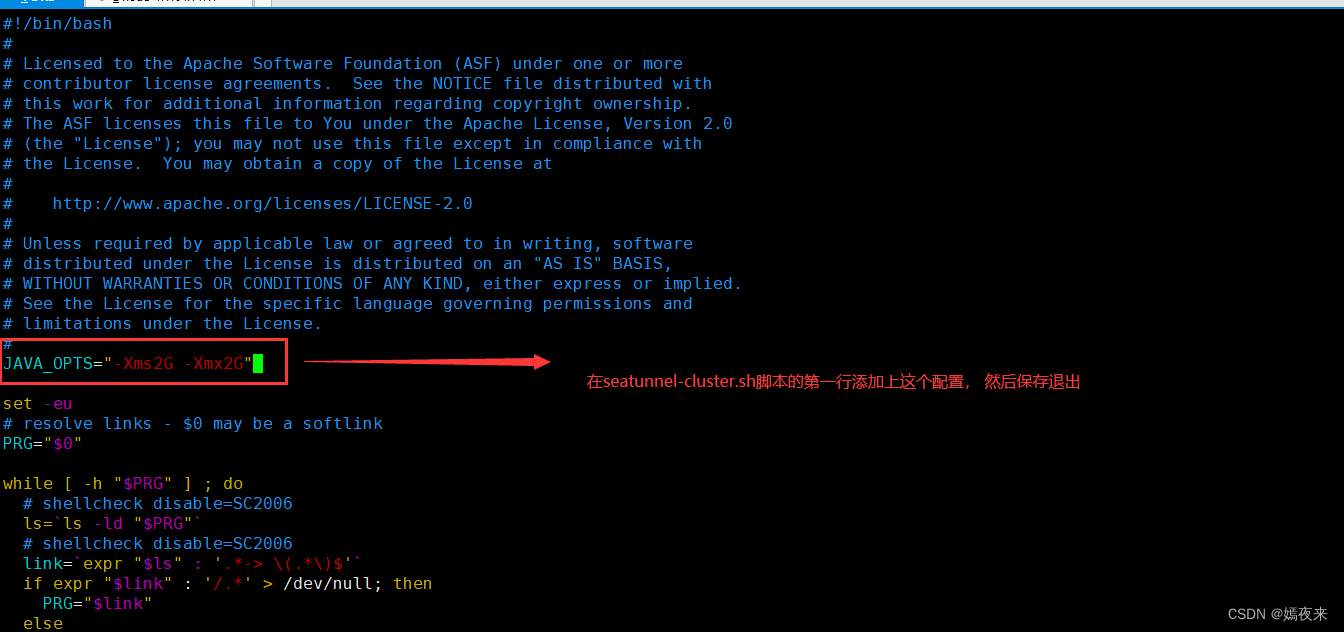
3.1.2.修改JVM参数
在seatunnel的安装目录,找到 $SEATUNNEL_HOME/bin/seatunnel-cluster.sh

将 JVM 选项添加到$SEATUNNEL_HOME/bin/seatunnel-cluster.sh第一行
JAVA_OPTS="-Xms2G -Xmx2G"
如果不想这样进行修改,也可以, 不过需要在进行集群启动时,自行增加JVM参数进行启动, 启动命令如下:
nohup sh $SEATUNNEL_HOME/bin/seatunnel-cluster.sh -DJvmOption="-Xms2G -Xmx2G" 2>&1 &
3.1.3.SeaTunnel Engine配置
SeaTunnel Engine Server配置是在sh $SEATUNNEL_HOME/config/seatunnel.yaml .
详细配置想可参考官方文档 4. Config SeaTunnel Engine,这里不赘述
3.1.4.SeaTunnel Engine Server配置
SeaTunnel Engine Server配置是在sh $SEATUNNEL_HOME/config/hazelcast.yaml .
3.1.4.1.集群名称配置
SeaTunnel Engine 节点使用集群名称来确定对方是否与自己是一个集群。 如果两个节点之间的集群名称不同,SeaTunnel 引擎将拒绝服务请求。
3.1.4.2.网络配置
SeaTunnel Engine 集群基于 Hazelcast,是运行 SeaTunnel Engine Server 的集群成员的网络。
集群成员自动连接在一起形成集群。 这种自动加入是通过集群成员用来查找彼此的各种发现机制来实现的。
请注意,集群形成后,集群成员之间的通信始终通过 TCP/IP 进行,无论使用何种发现机制。
SeaTunnel 引擎使用以下发现机制。
TCP
您可以将 SeaTunnel Engine 配置为完整的 TCP/IP 集群。 有关配置详细信息,请参阅通过 TCP 发现成员部分。
hazelcast.yaml配置示例如下:
hazelcast:
  cluster-name: seatunnel
  network:
    join:
      tcp-ip:
        enabled: true
        member-list:
          - hostname1
    port:
      auto-increment: false
      port: 5801
  properties:
    hazelcast.logging.type: log4j2
在独立 SeaTunnel 引擎集群中我们建议使用TCP方式。
另一方面,Hazelcast 提供了一些其他的服务发现方法。 详情请参考hazelcast网
3.1.4.3 Map配置
- type
imap持久化类型,目前仅支持hdfs。
- namespace
命令空间用于区分不同业务的数据存储位置,例如OSS的桶名。
- clusterName
这个参数主要用于集群隔离,我们可以通过这个来区分不同的集群,比如cluster1、cluster2,这个也可以用来区分不同的业务
- fs.defaultFS
We used hdfs api read/write file, so used this storage need provide hdfs configuration
if you used HDFS, you can config like this:
map:
    engine*:
       map-store:
         enabled: true
         initial-mode: EAGER
         factory-class-name: org.apache.seatunnel.engine.server.persistence.FileMapStoreFactory
         properties:
           type: hdfs
           namespace: /tmp/seatunnel/imap
           clusterName: seatunnel-cluster
           storage.type: hdfs
           fs.defaultFS: hdfs://localhost:9000
如果没有 HDFS 并且您的集群只有一个节点,您可以配置为使用本地文件,如下所示:
map:
    engine*:
       map-store:
         enabled: true
         initial-mode: EAGER
         factory-class-name: org.apache.seatunnel.engine.server.persistence.FileMapStoreFactory
         properties:
           type: hdfs
           namespace: /tmp/seatunnel/imap
           clusterName: seatunnel-cluster
           storage.type: hdfs
           fs.defaultFS: file:///
如果你使用OSS,你可以这样配置:
map:
    engine*:
       map-store:
         enabled: true
         initial-mode: EAGER
         factory-class-name: org.apache.seatunnel.engine.server.persistence.FileMapStoreFactory
         properties:
           type: hdfs
           namespace: /tmp/seatunnel/imap
           clusterName: seatunnel-cluster
           storage.type: oss
           block.size: block size(bytes)
           oss.bucket: oss://bucket name/
           fs.oss.accessKeyId: OSS access key id
           fs.oss.accessKeySecret: OSS access key secret
           fs.oss.endpoint: OSS endpoint
           fs.oss.credentials.provider: org.apache.hadoop.fs.aliyun.oss.AliyunCredentialsProvider
3.1.5.SeaTunnel Engine Client配置
SeaTunnel Engine Client配置是在sh $SEATUNNEL_HOME/config/hazelcast-client.yaml .
3.1.5.1.集群名称配置
客户端必须与 SeaTunnel 引擎具有相同的集群名称。 否则,SeaTunnel 引擎将拒绝客户端请求。
3.1.5.2. 网络配置
cluster-members
所有 SeaTunnel 引擎服务器节点地址都需要添加到此处。
hazelcast-client:
  cluster-name: seatunnel
  properties:
      hazelcast.logging.type: log4j2
  network:
    cluster-members:
      - hostname1:5801
3.1.6.启动Seatunnel引擎服务端节点
mkdir -p $SEATUNNEL_HOME/logs

cd $SEATUNNEL_HOME

./bin/seatunnel-cluster.sh -d
如果集群存在多台节点, 需要启动所有节点上的Seatunnel引擎服务。
3.1.7.安装Seatunnel引擎客户端并启动
您只需将SeaTunnel引擎节点上的安装目录目录复制到客户端节点主机的相同安装目录下,并像SeaTunnel引擎服务器节点一样配置SEATUNNEL_HOME,之后启动服务即可。
3.2.配置Seatunnel Web服务
3.2.1.数据库初始化
3.2.1.1.修改数据库连接配置
将script/seatunnel_server_env.sh相关配置改为你的对应的数据库信息
脚本配置在 web 目录下
$ pwd
/home/dh/bigdata/seatunnel-2.3.3/web/apache-seatunnel-web-1.0.0/script

$ ll
total 44
drwxr-xr-x 2 dh dh  4096 Jan  9 14:01 ./
drwxr-xr-x 8 dh dh  4096 Oct 11 13:37 ../
-rw-r--r-- 1 dh dh  1221 Feb 18  2022 init_sql.sh
-rw-r--r-- 1 dh dh   880 Feb 18  2022 seatunnel_server_env.sh
-rw-r--r-- 1 dh dh 12028 Feb 18  2022 seatunnel_server_h2.sql
-rw-r--r-- 1 dh dh 13243 Feb 18  2022 seatunnel_server_mysql.sql
备份:
cp seatunnel_server_env.sh seatunnel_server_env.sh_bak
修改配置
sudo vi seatunnel_server_env.sh
改为内容如下,根据自己的 mysql 服务改即可:
export HOSTNAME="172.24.20.97"
export PORT="13306"
export USERNAME="admin"
export PASSWORD="123456"
3.2.1.2. 执行初始化数据库命令
bash init_sql.sh
可以登录到 mysql 查看对应的表:
mysql> use seatunnel;
Reading table information for completion of table and column names
You can turn off this feature to get a quicker startup with -A

Database changed
mysql>
mysql>
mysql> show tables;
+---------------------------+
| Tables_in_seatunnel       |
+---------------------------+
| role                      |
| role_user_relation        |
| t_st_datasource           |
| t_st_job_definition       |
| t_st_job_instance         |
| t_st_job_instance_history |
| t_st_job_line             |
| t_st_job_metrics          |
| t_st_job_task             |
| t_st_job_version          |
| t_st_virtual_table        |
| user                      |
| user_login_log            |
+---------------------------+
13 rows in set (0.00 sec)
3.2.2.配置WEB后端服务
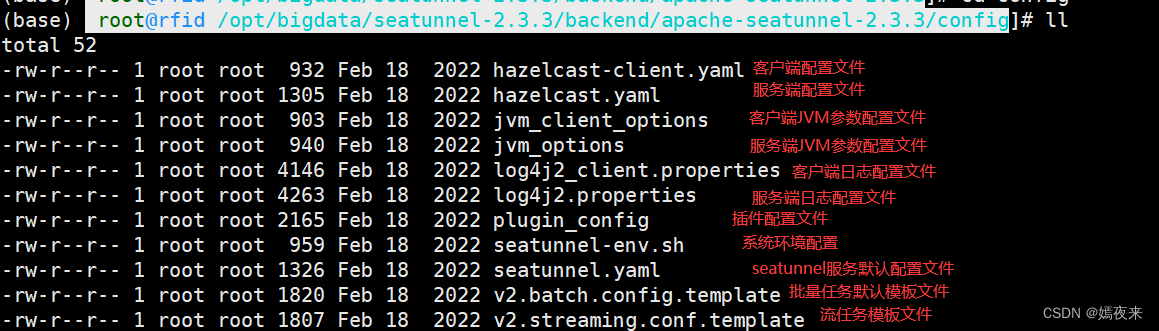
3.2.2.1.修改后端基础配置
web后端服务的配置文件都在 ${web安装目录}/conf 下
$ pwd
/home/dh/bigdata/seatunnel-2.3.3/web/apache-seatunnel-web-1.0.0/conf

$ ll
total 24
drwxr-xr-x 2 dh dh 4096 Oct 11 13:36 ./
drwxr-xr-x 8 dh dh 4096 Oct 11 13:37 ../
-rw-r--r-- 1 dh dh 1740 Feb 18  2022 application.yml
-rw-r--r-- 1 dh dh 4141 Feb 18  2022 connector-datasource-mapper.yaml
-rw-r--r-- 1 dh dh 2533 Feb 18  2022 logback-spring.xml
vim conf/application.yml 修改端口号和数据源连接信息
server:
  port: 18801

spring:
  application:
    name: seatunnel
  jackson:
    date-format: yyyy-MM-dd HH:mm:ss
  datasource:
    driver-class-name: com.mysql.jdbc.Driver
    url: jdbc:mysql://172.24.20.97:13306/seatunnel?useSSL=false&useUnicode=true&characterEncoding=utf-8&allowMultiQueries=true&allowPublicKeyRetrieval=true
    username: admin
    password: 123456
  mvc:
    pathmatch:
      matching-strategy: ant_path_matcher

jwt:
  expireTime: 86400
  secretKey: https://github.com/apache/seatunnel
  algorithm: HS256
3.2.2.2.配置client信息
将seatunnel引擎服务节点的安装目录下的config目录下的关于引擎客户端的配置文件拷贝到seatunnel-web安装目录下的conf目录下
同一台机器下部署直接使用以下拷贝命令(注意修改服务的安装目录为你自己的安装目录)
cp /home/dh/bigdata/seatunnel-2.3.3/backend/apache-seatunnel-2.3.3/config/hazelcast-client.yaml /home/dh/bigdata/seatunnel-2.3.3/web/apache-seatunnel-web-1.0.0/conf
验证:
$ pwd
/home/dh/bigdata/seatunnel-2.3.3/web/apache-seatunnel-web-1.0.0/conf

$ ll
total 28
drwxr-xr-x 2 dh dh 4096 Jan  9 16:36 ./
drwxr-xr-x 8 dh dh 4096 Oct 11 13:37 ../
-rw-r--r-- 1 dh dh 1746 Jan  9 16:33 application.yml
-rw-r--r-- 1 dh dh 4141 Feb 18  2022 connector-datasource-mapper.yaml
-rw-r--r-- 1 dh dh  932 Jan  9 16:36 hazelcast-client.yaml
-rw-r--r-- 1 dh dh 2533 Feb 18  2022 logback-spring.xml
3.2.2.3.配置支持的插件信息
将seatunnel引擎服务节点的安装目录下的connectors目录下的plugin-mapping.properties配置文件拷贝到seatunnel-web安装目录下的conf目录下
cp /home/dh/bigdata/seatunnel-2.3.3/backend/apache-seatunnel-2.3.3/connectors/plugin-mapping.properties /home/dh/bigdata/seatunnel-2.3.3/web/apache-seatunnel-web-1.0.0/conf
同一台机器下部署直接使用以下拷贝命令(注意修改服务的安装目录为你自己的安装目录)如果不在同一台机器上,可以使用scp命令或者下载下来然后上传到web服务的安装主机的安装目录下的conf目录下即可。
确认:
$ pwd
/home/dh/bigdata/seatunnel-2.3.3/web/apache-seatunnel-web-1.0.0/conf

$ ll
total 36
drwxr-xr-x 2 dh dh 4096 Jan  9 16:38 ./
drwxr-xr-x 8 dh dh 4096 Oct 11 13:37 ../
-rw-r--r-- 1 dh dh 1746 Jan  9 16:33 application.yml
-rw-r--r-- 1 dh dh 4141 Feb 18  2022 connector-datasource-mapper.yaml
-rw-r--r-- 1 dh dh  932 Jan  9 16:36 hazelcast-client.yaml
-rw-r--r-- 1 dh dh 2533 Feb 18  2022 logback-spring.xml
-rw-r--r-- 1 dh dh 5376 Jan  9 16:38 plugin-mapping.properties
3.2.3.下载配置数据源JAR包
这一步非常关键, 这一步如果没有配置好, 即使你正常启动了web应用,可能也会遇到下列问题:
数据源类型选择页面为空, 我这里因为正常配置, 所以正常显示

没有Source或者Sink进行选择
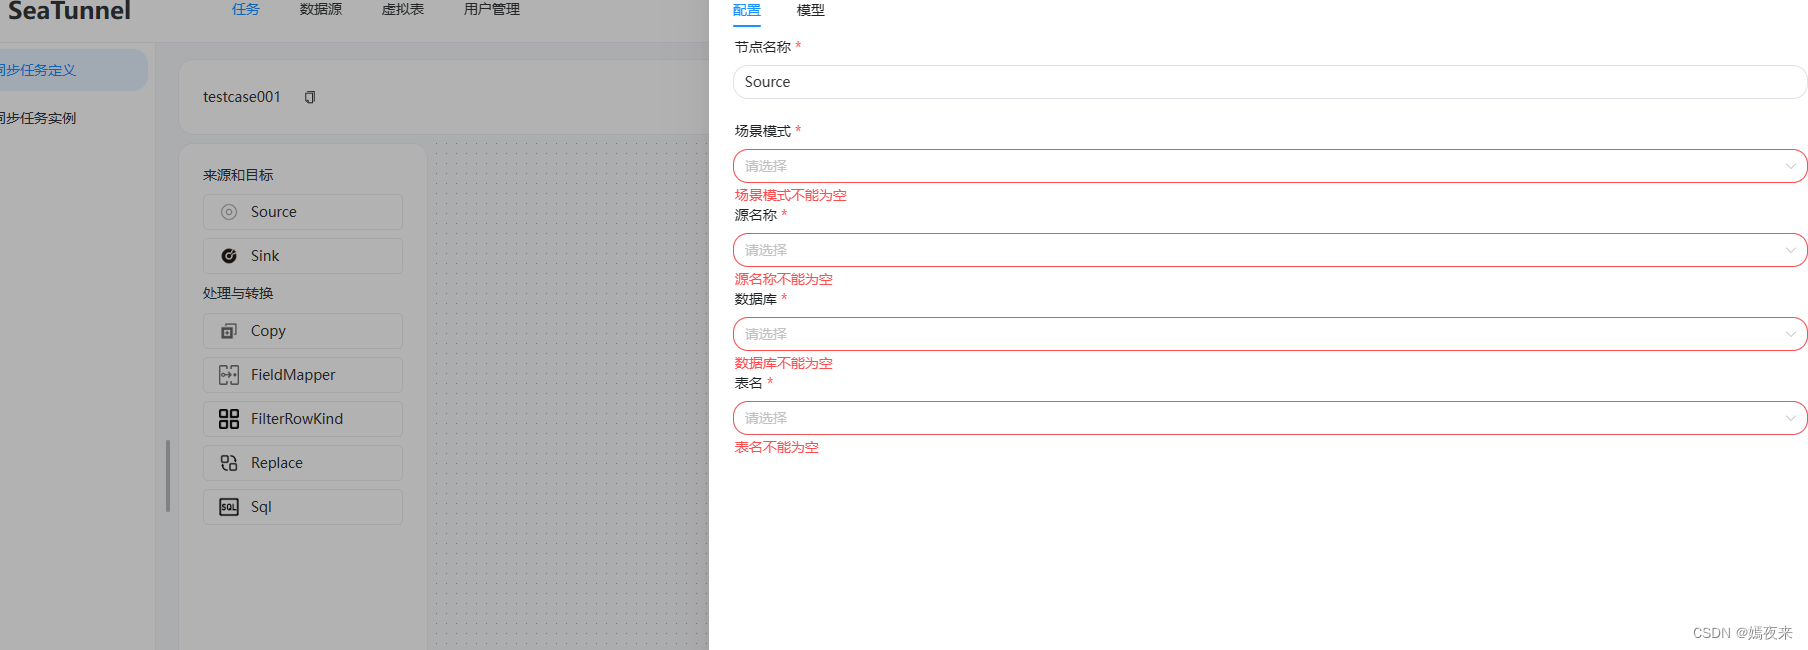
任务无法正常执行
3.2.3.1.获取下载脚本
数据源JAR包的下载脚本在 seatunnel-web 的源码包中存在,它的目录在:
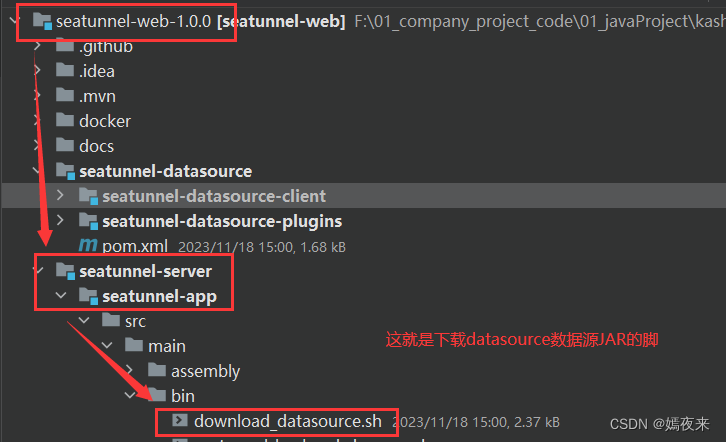
我们访问官方代码:
git clone git@github.com:apache/seatunnel-web.git
也可以直接访问
原始内容如下:
#!/bin/bash
#
# Licensed to the Apache Software Foundation (ASF) under one or more
# contributor license agreements.  See the NOTICE file distributed with
# this work for additional information regarding copyright ownership.
# The ASF licenses this file to You under the Apache License, Version 2.0
# (the "License"); you may not use this file except in compliance with
# the License.  You may obtain a copy of the License at
#
#    http://www.apache.org/licenses/LICENSE-2.0
#
# Unless required by applicable law or agreed to in writing, software
# distributed under the License is distributed on an "AS IS" BASIS,
# WITHOUT WARRANTIES OR CONDITIONS OF ANY KIND, either express or implied.
# See the License for the specific language governing permissions and
# limitations under the License.
#

#This script is used to download the connector plug-ins required during the running process.
#All are downloaded by default. You can also choose what you need.
#You only need to configure the plug-in name in config/plugin_config.

# get seatunnel web home
SEATUNNEL_WEB_HOME=$(cd $(dirname $0);cd ../;pwd)
DATASOURCE_DIR=${SEATUNNEL_WEB_HOME}/datasource

# If you don’t want to download a certain data source, you can delete the element below
datasource_list=(
  "datasource-plugins-api"
  "datasource-elasticsearch"
  "datasource-hive"
  "datasource-jdbc-clickhouse"
  "datasource-jdbc-hive"
  "datasource-jdbc-mysql"
  "datasource-jdbc-oracle"
  "datasource-jdbc-postgresql"
  "datasource-jdbc-redshift"
  "datasource-jdbc-sqlserver"
  "datasource-jdbc-starrocks"
  "datasource-jdbc-tidb"
  "datasource-kafka"
  "datasource-mysql-cdc"
  "datasource-s3"
  "datasource-sqlserver-cdc"
  "datasource-starrocks"
  "datasource-mongodb"
)

# the datasource default version is 1.0.0, you can also choose a custom version. eg: 1.1.2:  sh install-datasource.sh 2.1.2
version=1.0.0

if [ -n "$1" ]; then
    version="$1"
fi

echo "Downloading SeaTunnel Web Datasource lib, usage version is ${version}"

# create the datasource directory
if [ ! -d "$DATASOURCE_DIR" ];
  then
      mkdir -p "$DATASOURCE_DIR"
      echo "Created datasource directory."
fi

for i in "${datasource_list[@]}"
do
	echo "$i"
	echo "Downloading datasource: " "$i"
  "$SEATUNNEL_WEB_HOME"/mvnw dependency:get -DgroupId=org.apache.seatunnel -DartifactId="$i" -Dversion="$version" -Ddest="$DATASOURCE_DIR"
done
说白了就是在指定的目录下载对应的包。
3.2.3.2.执行下载脚本
我们把上面的下载脚本修改一下:
我们把下载目录改成:
1) DATASOURCE_DIR=/home/dh/bigdata/seatunnel-2.3.3/jars,然后在 linux 机器上创建这个下载脚本。
2) 使用 mvn 命令下载,替代原来的 mvnw
mvn dependency:get -DgroupId=org.apache.seatunnel -DartifactId="$i" -Dversion="$version" -Ddest="$DATASOURCE_DIR"
完整如下:
#!/bin/bash
#
# Licensed to the Apache Software Foundation (ASF) under one or more
# contributor license agreements.  See the NOTICE file distributed with
# this work for additional information regarding copyright ownership.
# The ASF licenses this file to You under the Apache License, Version 2.0
# (the "License"); you may not use this file except in compliance with
# the License.  You may obtain a copy of the License at
#
#    http://www.apache.org/licenses/LICENSE-2.0
#
# Unless required by applicable law or agreed to in writing, software
# distributed under the License is distributed on an "AS IS" BASIS,
# WITHOUT WARRANTIES OR CONDITIONS OF ANY KIND, either express or implied.
# See the License for the specific language governing permissions and
# limitations under the License.
#

#This script is used to download the connector plug-ins required during the running process.
#All are downloaded by default. You can also choose what you need.
#You only need to configure the plug-in name in config/plugin_config.

# get seatunnel web home
#SEATUNNEL_WEB_HOME=$(cd $(dirname $0);cd ../;pwd)
#DATASOURCE_DIR=${SEATUNNEL_WEB_HOME}/datasource
DATASOURCE_DIR=/home/dh/bigdata/seatunnel-2.3.3/jars

# If you don’t want to download a certain data source, you can delete the element below
datasource_list=(
  "datasource-plugins-api"
  "datasource-elasticsearch"
  "datasource-hive"
  "datasource-jdbc-clickhouse"
  "datasource-jdbc-hive"
  "datasource-jdbc-mysql"
  "datasource-jdbc-oracle"
  "datasource-jdbc-postgresql"
  "datasource-jdbc-redshift"
  "datasource-jdbc-sqlserver"
  "datasource-jdbc-starrocks"
  "datasource-jdbc-tidb"
  "datasource-kafka"
  "datasource-mysql-cdc"
  "datasource-s3"
  "datasource-sqlserver-cdc"
  "datasource-starrocks"
  "datasource-mongodb"
)

# the datasource default version is 1.0.0, you can also choose a custom version. eg: 1.1.2:  sh install-datasource.sh 2.1.2
version=1.0.0

if [ -n "$1" ]; then
    version="$1"
fi

echo "Downloading SeaTunnel Web Datasource lib, usage version is ${version}"

# create the datasource directory
if [ ! -d "$DATASOURCE_DIR" ];
  then
      mkdir -p "$DATASOURCE_DIR"
      echo "Created datasource directory."
fi

for i in "${datasource_list[@]}"
do
	echo "$i"
	echo "Downloading datasource: " "$i"
  #"$SEATUNNEL_WEB_HOME"/mvnw dependency:get -DgroupId=org.apache.seatunnel -DartifactId="$i" -Dversion="$version" -Ddest="$DATASOURCE_DIR"
  mvn dependency:get -DgroupId=org.apache.seatunnel -DartifactId="$i" -Dversion="$version" -Ddest="$DATASOURCE_DIR"
done
创建脚本,内容如上
vi download_jars.sh
赋权执行:
chmod +x download_jars.sh
./download_jars.sh
下载过程中有一个失败:
[INFO] ------------------------------------------------------------------------
[ERROR] Failed to execute goal org.apache.maven.plugins:maven-dependency-plugin:2.8:get (default-cli) on project standalone-pom: Couldn't download artifact: Missing:
[ERROR] ----------
[ERROR] 1) org.apache.seatunnel:datasource-mongodb:jar:1.0.0
[ERROR]
[ERROR]   Try downloading the file manually from the project website.
[ERROR]
[ERROR]   Then, install it using the command:
[ERROR]       mvn install:install-file -DgroupId=org.apache.seatunnel -DartifactId=datasource-mongodb -Dversion=1.0.0 -Dpackaging=jar -Dfile=/path/to/file
[ERROR]
[ERROR]   Alternatively, if you host your own repository you can deploy the file there:
[ERROR]       mvn deploy:deploy-file -DgroupId=org.apache.seatunnel -DartifactId=datasource-mongodb -Dversion=1.0.0 -Dpackaging=jar -Dfile=/path/to/file -Durl=[url] -DrepositoryId=[id]
[ERROR]
[ERROR]   Path to dependency:
[ERROR]         1) org.apache.maven.plugins:maven-downloader-plugin:jar:1.0
[ERROR]         2) org.apache.seatunnel:datasource-mongodb:jar:1.0.0
[ERROR]
[ERROR] ----------
[ERROR] 1 required artifact is missing.
[ERROR]
[ERROR] for artifact:
[ERROR]   org.apache.maven.plugins:maven-downloader-plugin:jar:1.0
[ERROR]
[ERROR] from the specified remote repositories:
发现这里就是没有 mongodb
3.2.3.3. 下载额外的 mysql 包
我们在 /home/dh/bigdata/seatunnel-2.3.3/jars/ 中额外下载一个 mysql 8.0 的启动包。
1) maven 方式
<dependency>
    <groupId>mysql</groupId>
    <artifactId>mysql-connector-java</artifactId>
    <version>8.0.23</version> <!-- 这里使用你需要的具体版本号 -->
</dependency>
https://mvnrepository.com/artifact/mysql/mysql-connector-java
实际上这个项目迁移到了 https://github.com/mysql/mysql-connector-j
2)jar 的地址
手动下载后上传,huozhe直接:
cd /home/dh/bigdata/seatunnel-2.3.3/jars/
wget https://repo1.maven.org/maven2/com/mysql/mysql-connector-j/8.2.0/mysql-connector-j-8.2.0.jar
3.2.3.4. 复制到对应的目录
1) 将以上所有jar包复制到 /home/dh/bigdata/seatunnel-2.3.3/web/apache-seatunnel-web-1.0.0/libs 目录下
cp /home/dh/bigdata/seatunnel-2.3.3/jars/* /home/dh/bigdata/seatunnel-2.3.3/web/apache-seatunnel-web-1.0.0/libs
确认:
cd /home/dh/bigdata/seatunnel-2.3.3/web/apache-seatunnel-web-1.0.0/libs
2) 将以上所有jar包复制到 /home/dh/bigdata/seatunnel-2.3.3/backend/apache-seatunnel-2.3.3/lib 目录下
cp /home/dh/bigdata/seatunnel-2.3.3/jars/* /home/dh/bigdata/seatunnel-2.3.3/backend/apache-seatunnel-2.3.3/lib
3.2.5.启动WEB服务
这一步也很容易出错,很多人都配置对了,但是最后启动起来,发现无法通过浏览访问, 查看日志打印如下:
$ pwd
/home/dh/bigdata/seatunnel-2.3.3/web/apache-seatunnel-web-1.0.0

$ ll
total 100
drwxr-xr-x 8 dh dh  4096 Oct 11 13:37 ./
drwxr-xr-x 3 dh dh  4096 Jan  9 14:01 ../
-rw-r--r-- 1 dh dh   552 Feb 18  2022 DISCLAIMER
-rw-r--r-- 1 dh dh 32455 Feb 18  2022 LICENSE
-rw-r--r-- 1 dh dh 23737 Feb 18  2022 NOTICE
drwxr-xr-x 2 dh dh  4096 Jan  9 14:01 bin/
drwxr-xr-x 2 dh dh  4096 Jan  9 16:38 conf/
drwxr-xr-x 2 dh dh 12288 Jan  9 17:55 libs/
drwxr-xr-x 3 dh dh  4096 Jan  9 14:01 licenses/
drwxr-xr-x 2 dh dh  4096 Jan  9 16:26 script/
drwxr-xr-x 3 dh dh  4096 Jan  9 14:01 ui/
所以启动服务必须要保证服务可以访问到ui目录下的index.html文件才可以,因为项目启动前端的项目路径默认添加了/ui的前缀,所以后端项目的启动路径必须在ui目录的父级目录才可以,所以这里需要再web服务的安装目录下执行启动脚本,举例:
我这里的安装目录是 /home/dh/bigdata/seatunnel-2.3.3/web/apache-seatunnel-web-1.0.0, 所以我这里直接切换到该目录下,执行以下启动命令:
#进入web服务的安装目录
cd /home/dh/bigdata/seatunnel-2.3.3/web/apache-seatunnel-web-1.0.0
#执行启动脚本
chmod +x ./bin/seatunnel-backend-daemon.sh

./bin/seatunnel-backend-daemon.sh start
报错:
starting seatunnel...
JAVA_HOME is not set
这个配置一下 JAVA_HOME 即可。
日志查看的方式:
$ pwd
/home/dh/bigdata/seatunnel-2.3.3/web/apache-seatunnel-web-1.0.0/logs

$ ll
total 28
drwxr-xr-x 2 dh dh  4096 Jan  9 18:24 ./
drwxr-xr-x 9 dh dh  4096 Jan  9 18:24 ../
-rw-r--r-- 1 dh dh 19202 Jan  9 18:26 seatunnel-web.log
无法访问报错1
【发现无法访问】
可以把服务 kill 掉
ps -ef | grep java
查看日志,异常如下:
2024-01-09 18:28:00.710 seatunnel d INFO [main] [ContextHandler$Context.log():2368] - Initializing Spring embedded WebApplicationContext
2024-01-09 18:28:00.711 seatunnel d INFO [main] [ServletWebServerApplicationContext.prepareWebApplicationContext():290] - Root WebApplicationContext: initialization completed in 1233 ms
2024-01-09 18:28:00.749 seatunnel d INFO [main] [DefaultSessionIdManager.doStart():334] - DefaultSessionIdManager workerName=node0
2024-01-09 18:28:00.750 seatunnel d INFO [main] [DefaultSessionIdManager.doStart():339] - No SessionScavenger set, using defaults
2024-01-09 18:28:00.752 seatunnel d INFO [main] [HouseKeeper.startScavenging():132] - node0 Scavenging every 600000ms
2024-01-09 18:28:00.765 seatunnel d WARN [main] [WebAppContext.doStart():533] - Failed startup of context o.s.b.w.e.j.JettyEmbeddedWebAppContext@12219f6a{application,/,[file:///tmp/jetty-docbase.18801.560579552291874252/, jar:file:/home/dh/bigdata/seatunnel-2.3.3/web/apache-seatunnel-web-1.0.0/libs/springfox-swagger-ui-2.6.1.jar!/META-INF/resources],UNAVAILABLE}
java.lang.NoSuchMethodError: org.eclipse.jetty.http.pathmap.PathMappings.put(Lorg/eclipse/jetty/http/pathmap/PathSpec;Ljava/lang/Object;)Z
        at org.eclipse.jetty.servlet.ServletHandler.updateMappings(ServletHandler.java:1407)
        at org.eclipse.jetty.servlet.ServletHandler.doStart(ServletHandler.java:160)
        at org.eclipse.jetty.util.component.AbstractLifeCycle.start(AbstractLifeCycle.java:72)
        at org.eclipse.jetty.util.component.ContainerLifeCycle.start(ContainerLifeCycle.java:169)
        at org.eclipse.jetty.util.component.ContainerLifeCycle.doStart(ContainerLifeCycle.java:110)
        at org.eclipse.jetty.server.handler.AbstractHandler.doStart(AbstractHandler.java:97)
        at org.eclipse.jetty.security.SecurityHandler.doStart(SecurityHandler.java:411)
        at org.eclipse.jetty.security.ConstraintSecurityHandler.doStart(ConstraintSecurityHandler.java:417)
        at org.eclipse.jetty.util.component.AbstractLifeCycle.start(AbstractLifeCycle.java:72)
        at org.eclipse.jetty.util.component.ContainerLifeCycle.start(ContainerLifeCycle.java:169)
        at org.eclipse.jetty.util.component.ContainerLifeCycle.doStart(ContainerLifeCycle.java:110)
        at org.eclipse.jetty.server.handler.AbstractHandler.doStart(AbstractHandler.java:97)
        at org.eclipse.jetty.server.handler.ScopedHandler.doStart(ScopedHandler.java:120)
        at org.eclipse.jetty.server.session.SessionHandler.doStart(SessionHandler.java:505)
        at org.eclipse.jetty.util.component.AbstractLifeCycle.start(AbstractLifeCycle.java:72)
        at org.eclipse.jetty.util.component.ContainerLifeCycle.start(ContainerLifeCycle.java:169)
        at org.eclipse.jetty.util.component.ContainerLifeCycle.doStart(ContainerLifeCycle.java:110)
        at org.eclipse.jetty.server.handler.AbstractHandler.doStart(AbstractHandler.java:97)
        at org.eclipse.jetty.server.handler.ScopedHandler.doStart(ScopedHandler.java:120)
        at org.eclipse.jetty.server.handler.ContextHandler.startContext(ContextHandler.java:975)
        at org.eclipse.jetty.servlet.ServletContextHandler.startContext(ServletContextHandler.java:357)
        at org.eclipse.jetty.webapp.WebAppContext.startWebapp(WebAppContext.java:1443)
        at org.eclipse.jetty.webapp.WebAppContext.startContext(WebAppContext.java:1407)
        at org.eclipse.jetty.server.handler.ContextHandler.doStart(ContextHandler.java:916)
        at org.eclipse.jetty.servlet.ServletContextHandler.doStart(ServletContextHandler.java:276)
:
这里应该是包冲突了。
该异常表明在使用 Seatunnel 时,发生了版本不兼容的问题,涉及到 Jetty 的相关类 org.eclipse.jetty.servlet.ServletHandler 和 org.eclipse.jetty.http.pathmap.PathMappings。
在你的异常信息中,有两个不同的 Jar 文件提供了 org.eclipse.jetty.servlet.ServletHandler 类,一个是 datasource-hive-1.0.0.jar,另一个是 jetty-servlet-9.4.46.v20220331.jar。这可能导致类加载的混淆和不一致性。
我们移除一下
cd /home/dh/bigdata/seatunnel-2.3.3/web/apache-seatunnel-web-1.0.0/libs
rm datasource-hive-1.0.0.jar
重新启动:
cd /home/dh/bigdata/seatunnel-2.3.3/web/apache-seatunnel-web-1.0.0
./bin/seatunnel-backend-daemon.sh start
无法访问报错2
2024-01-09 18:43:50.588 seatunnel d WARN [main] [ClientLoggingService$DefaultLogger.log():104] - hz.client_1 [seatunnel] [5.1] Exception during initial connection to [localhost]:5801: com.hazelcast.core.HazelcastException: java.io.IOException: Connection refused to address localhost/127.0.0.1:5801
2024-01-09 18:43:50.589 seatunnel d WARN [main] [ClientLoggingService$DefaultLogger.log():104] - hz.client_1 [seatunnel] [5.1] Unable to get live cluster connection, retry in 7698 ms, attempt: 43, cluster connect timeout: INFINITE, max backoff: 30000 ms
这个在连接我们的 backend
后台服务还在吗?可能被我们误杀了。
1) backend 服务启动
#进入安装目录
$   cd /home/dh/bigdata/seatunnel-2.3.3/backend/apache-seatunnel-2.3.3

# 启动服务
$   nohup bash bin/seatunnel-cluster.sh 2>&1 &
日志查看在
tail -f /home/dh/bigdata/seatunnel-2.3.3/backend/apache-seatunnel-2.3.3/logs/seatunnel-engine-server.log
2) 重新启动
cd /home/dh/bigdata/seatunnel-2.3.3/web/apache-seatunnel-web-1.0.0
./bin/seatunnel-backend-daemon.sh start
成功日志:
2024-01-09 18:46:52.145 seatunnel d INFO [main] [AbstractLogger.info():69] - Client statistics is enabled with period 5 seconds.
2024-01-09 18:46:52.336 seatunnel d INFO [main] [ContextHandler$Context.log():2368] - Initializing Spring DispatcherServlet 'dispatcherServlet'
2024-01-09 18:46:52.337 seatunnel d INFO [main] [FrameworkServlet.initServletBean():525] - Initializing Servlet 'dispatcherServlet'
2024-01-09 18:46:52.339 seatunnel d INFO [main] [FrameworkServlet.initServletBean():547] - Completed initialization in 2 ms
2024-01-09 18:46:52.358 seatunnel d INFO [main] [AbstractConnector.doStart():333] - Started ServerConnector@4130955c{HTTP/1.1, (http/1.1)}{0.0.0.0:18801}
2024-01-09 18:46:52.360 seatunnel d INFO [main] [JettyWebServer.start():172] - Jetty started on port(s) 18801 (http/1.1) with context path '/'
2024-01-09 18:46:52.361 seatunnel d INFO [main] [DocumentationPluginsBootstrapper.start():120] - Context refreshed
2024-01-09 18:46:52.379 seatunnel d INFO [main] [DocumentationPluginsBootstrapper.start():123] - Found 1 custom documentation plugin(s)
2024-01-09 18:46:52.391 seatunnel d INFO [main] [ApiListingReferenceScanner.scan():41] - Scanning for api listing references
2024-01-09 18:46:52.564 seatunnel d INFO [main] [CachingOperationNameGenerator.startingWith():40] - Generating unique operation named: listAllTransformUsingGET_1
2024-01-09 18:46:52.573 seatunnel d INFO [main] [CachingOperationNameGenerator.startingWith():40] - Generating unique operation named: listSinkUsingGET_1
2024-01-09 18:46:52.578 seatunnel d INFO [main] [CachingOperationNameGenerator.startingWith():40] - Generating unique operation named: listSourceUsingGET_1
2024-01-09 18:46:52.581 seatunnel d INFO [main] [CachingOperationNameGenerator.startingWith():40] - Generating unique operation named: syncUsingGET_1
2024-01-09 18:46:52.644 seatunnel d INFO [main] [CachingOperationNameGenerator.startingWith():40] - Generating unique operation named: getJobDefinitionUsingGET_1
2024-01-09 18:46:53.130 seatunnel d INFO [main] [StartupInfoLogger.logStarted():61] - Started SeatunnelApplication in 5.721 seconds (JVM running for 6.083)
访问
vim conf/application.yml 修改端口号和数据源连接信息
server:
  port: 18801

spring:
  application:
    name: seatunnel
  jackson:
    date-format: yyyy-MM-dd HH:mm:ss
  datasource:
    driver-class-name: com.mysql.jdbc.Driver
    url: jdbc:mysql://172.24.20.97:13306/seatunnel?useSSL=false&useUnicode=true&characterEncoding=utf-8&allowMultiQueries=true&allowPublicKeyRetrieval=true
    username: admin
    password: 123456
  mvc:
    pathmatch:
      matching-strategy: ant_path_matcher

jwt:
  expireTime: 86400
  secretKey: https://github.com/apache/seatunnel
  algorithm: HS256
访问 http://127.0.0.1:18801 (此端口为conf/application.yml中配置的端口), 页面自动跳转到http://主机IP:12306/ui,
默认登录的用户名和密码:
username:admin password:admin
最后的资源
https://pan.baidu.com/s/1x8G8DCixt7SFnd-r5AFkhg
集群配置
3.1.安装配置Seatunnel引擎集群
在SeaTunnel的Web端机器上需要安装SeaTunnel客户端,如果服务端与Web端在同一台机器,则可直接跳过这个步骤。
本文档的安装过程中,Seatunnel服务端和web是安装在同一台机器上, 所以直接跳过此步安装步骤。
这里所说的Seatunnel引擎客户端其实就是我们章2中安装的Seatunnel服务端, 下面讲解一下如何进行Seatunnel集群的安装配置
3.1.1.准备服务器节点
我们现在需要搭建Seatunnel引擎集群,需要准备n台服务器节点, 我这里使用了3台服务器。
比如, 已知我们的3台服务器的IP分别是
192.168.1.110

192.168.1.111

192.168.1.112
我们直接在章2中已经安装部署好的Seatunnel单节点中进行集群的配置,主要的配置修改包含以下几项:
3.1.2.修改JVM参数
在seatunnel的安装目录,找到 $SEATUNNEL_HOME/bin/seatunnel-cluster.sh
将 JVM 选项添加到$SEATUNNEL_HOME/bin/seatunnel-cluster.sh第一行
JAVA_OPTS=“-Xms2G -Xmx2G”
如果不想这样进行修改,也可以, 不过需要在进行集群启动时,自行增加JVM参数进行启动, 启动命令如下:
也可以用这种方式启动:
nohup sh $SEATUNNEL_HOME/bin/seatunnel-cluster.sh -DJvmOption="-Xms2G -Xmx2G" 2>&1 &
3.1.3.SeaTunnel Engine配置
SeaTunnel Engine Server配置是在sh $SEATUNNEL_HOME/config/seatunnel.yaml .
详细配置想可参考官方文档 4. Config SeaTunnel Engine,这里不赘述
3.1.4.SeaTunnel Engine Server配置
SeaTunnel Engine Server配置是在 sh $SEATUNNEL_HOME/config/hazelcast.yaml .
3.1.4.1.集群名称配置
SeaTunnel Engine 节点使用集群名称来确定对方是否与自己是一个集群。
如果两个节点之间的集群名称不同,SeaTunnel 引擎将拒绝服务请求。
3.1.4.2.网络配置
SeaTunnel Engine 集群基于 Hazelcast,是运行 SeaTunnel Engine Server 的集群成员的网络。
集群成员自动连接在一起形成集群。
这种自动加入是通过集群成员用来查找彼此的各种发现机制来实现的。
请注意,集群形成后,集群成员之间的通信始终通过 TCP/IP 进行,无论使用何种发现机制。
SeaTunnel 引擎使用以下发现机制。
TCP
您可以将 SeaTunnel Engine 配置为完整的 TCP/IP 集群。
有关配置详细信息,请参阅通过 TCP 发现成员部分。
hazelcast.yaml 配置示例如下:
hazelcast:
  cluster-name: seatunnel
  network:
    join:
      tcp-ip:
        enabled: true
        member-list:
          - hostname1
    port:
      auto-increment: false
      port: 5801
  properties:
    hazelcast.logging.type: log4j2
在独立 SeaTunnel 引擎集群中我们建议使用TCP方式。
另一方面,Hazelcast 提供了一些其他的服务发现方法。 详情请参考hazelcast网
3.1.4.3 Map配置
type imap持久化类型,目前仅支持hdfs。
namespace 命令空间用于区分不同业务的数据存储位置,例如OSS的桶名。
clusterName 这个参数主要用于集群隔离,我们可以通过这个来区分不同的集群,比如cluster1、cluster2,这个也可以用来区分不同的业务
fs.defaultFS We used hdfs api read/write file, so used this storage need provide hdfs configuration
if you used HDFS, you can config like this:
map:
    engine*:
       map-store:
         enabled: true
         initial-mode: EAGER
         factory-class-name: org.apache.seatunnel.engine.server.persistence.FileMapStoreFactory
         properties:
           type: hdfs
           namespace: /tmp/seatunnel/imap
           clusterName: seatunnel-cluster
           storage.type: hdfs
           fs.defaultFS: hdfs://localhost:9000
我也看到最简单的配置:
  map:
    map-name-template:
      map-store:
        enabled: true
        initial-mode: EAGER
        class-name: org.apache.seatunnel.engine.server.persistence.FileMapStore
        properties:
          path: /tmp/file-store-map
如果没有 HDFS 并且您的集群只有一个节点,您可以配置为使用本地文件,如下所示:
map:
    engine*:
       map-store:
         enabled: true
         initial-mode: EAGER
         factory-class-name: org.apache.seatunnel.engine.server.persistence.FileMapStoreFactory
         properties:
           type: hdfs
           namespace: /tmp/seatunnel/imap
           clusterName: seatunnel-cluster
           storage.type: hdfs
           fs.defaultFS: file:///
如果你使用OSS,你可以这样配置:
map:
    engine*:
       map-store:
         enabled: true
         initial-mode: EAGER
         factory-class-name: org.apache.seatunnel.engine.server.persistence.FileMapStoreFactory
         properties:
           type: hdfs
           namespace: /tmp/seatunnel/imap
           clusterName: seatunnel-cluster
           storage.type: oss
           block.size: block size(bytes)
           oss.bucket: oss://bucket name/
           fs.oss.accessKeyId: OSS access key id
           fs.oss.accessKeySecret: OSS access key secret
           fs.oss.endpoint: OSS endpoint
           fs.oss.credentials.provider: org.apache.hadoop.fs.aliyun.oss.AliyunCredentialsProvider
3.1.5.SeaTunnel Engine Client配置
SeaTunnel Engine Client配置是在sh $SEATUNNEL_HOME/config/hazelcast-client.yaml .
3.1.5.1.集群名称配置
客户端必须与 SeaTunnel 引擎具有相同的集群名称。
否则,SeaTunnel 引擎将拒绝客户端请求。
3.1.5.2.网络配置
cluster-members
所有 SeaTunnel 引擎服务器节点地址都需要添加到此处。
hazelcast-client:
  cluster-name: seatunnel
  properties:
      hazelcast.logging.type: log4j2
  network:
    cluster-members:
      - hostname1:5801
3.1.6.启动Seatunnel引擎服务端节点
mkdir -p $SEATUNNEL_HOME/logs

cd $SEATUNNEL_HOME

./bin/seatunnel-cluster.sh -d
如果集群存在多台节点, 需要启动所有节点上的Seatunnel引擎服务。
3.1.7.安装Seatunnel引擎客户端并启动
您只需将SeaTunnel引擎节点上的安装目录目录复制到客户端节点主机的相同安装目录下,并像SeaTunnel引擎服务器节点一样配置SEATUNNEL_HOME,之后启动服务即可。
参考资料
https://blog.csdn.net/qq_41865652/article/details/134574104
https://avoid.overfit.cn/post/ac32f113f8b8490d980ed761122c4237
更多学习
更多实时资讯,前沿技术,生活趣事。尽在【老马啸西风】
交流社群:[交流群信息](https://mp.weixin.qq.com/s/rkSvXxiiLGjl3S-ZOZCr0Q)
