
Dubbo-01-overview
回顾
大家好,我是老马。
上一节我们一起学习了 5 分钟入门 spring cloud 实战笔记。
本文大家一起来学习下 dubbo 的入门案例,共计 3 种方式,总有一款适合你!
Dubbo
Dubbo是一个分布式的高性能RPC框架,可为应用程序提供服务导入/导出功能。
架构
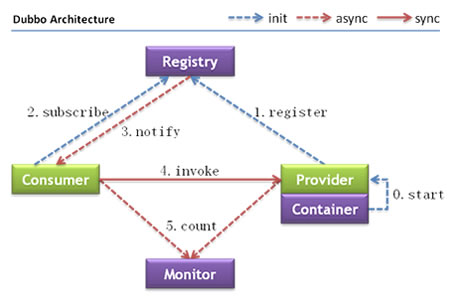
节点角色说明

调用关系说明
服务容器负责启动,加载,运行服务提供者。
服务提供者在启动时,向注册中心注册自己提供的服务。
服务消费者在启动时,向注册中心订阅自己所需的服务。
注册中心返回服务提供者地址列表给消费者,如果有变更,注册中心将基于长连接推送变更数据给消费者。
服务消费者,从提供者地址列表中,基于软负载均衡算法,选一台提供者进行调用,如果调用失败,再选另一台调用。
服务消费者和提供者,在内存中累计调用次数和调用时间,定时每分钟发送一次统计数据到监控中心。
这样直接看一遍还是没啥感觉,我们通过 3 种方式的入门案例,加深一下大家的理解。
根据官方的 example 例子
启动服务注册中心
启用内嵌的 zk 服务,或者使用 zookeeper 作为注册中心。
package com.github.houbb.dubbo.learn.zk;

import java.io.File;
import java.util.Properties;
import java.util.UUID;

import org.apache.zookeeper.server.ServerConfig;
import org.apache.zookeeper.server.ZooKeeperServerMain;
import org.apache.zookeeper.server.quorum.QuorumPeerConfig;

public class EmbeddedZooKeeper {

    public static void main(String[] args) throws Exception {
        int port = 2181;
        if (args.length == 1) {
            port = Integer.parseInt(args[0]);
        }

        Properties properties = new Properties();
        File file = new File(System.getProperty("java.io.tmpdir")
                + File.separator + UUID.randomUUID());
        file.deleteOnExit();
        properties.setProperty("dataDir", file.getAbsolutePath());
        properties.setProperty("clientPort", String.valueOf(port));

        QuorumPeerConfig quorumPeerConfig = new QuorumPeerConfig();
        quorumPeerConfig.parseProperties(properties);

        ZooKeeperServerMain zkServer = new ZooKeeperServerMain();
        ServerConfig configuration = new ServerConfig();
        configuration.readFrom(quorumPeerConfig);

        try {
            zkServer.runFromConfig(configuration);
            System.out.println("----------------- EmbeddedZooKeeper started on port 2181");
        } catch (Exception e) {
            e.printStackTrace();
            System.exit(1);
        }
    }
}
maven 依赖
上面的 maven 依赖如下:
    4.0.0

        org.example
        dubbo-learn
        1.0-SNAPSHOT


    dubbo-learn-zk


        3.8.0


                org.apache.zookeeper
                parent
                ${zookeeper.version}
                pom
                import


            org.apache.zookeeper
            zookeeper
            ${zookeeper.version}


                    netty-handler
                    io.netty


                    netty-transport-native-epoll
                    io.netty


            commons-cli
            commons-cli


            org.eclipse.jetty
            jetty-server


            org.eclipse.jetty
            jetty-servlet


            org.eclipse.jetty
            jetty-client


            jline
            jline


            io.dropwizard.metrics
            metrics-core


            org.xerial.snappy
            snappy-java


                org.codehaus.mojo
                exec-maven-plugin
                3.1.0

                    org.apache.dubbo.samples.EmbeddedZooKeeper


                org.apache.maven.plugins
                maven-compiler-plugin
                3.11.0

                    8
                    8
基于 api 实现
个人理解最简单的 dubbo 入门案例应该是基于 api 的定义实现,因为 dubbo 是完全可以独立于 spring 存在的。
虽然 dubbo 可以和 spring 进行很好的整合,但是最基本的 api 定义显然更容易理解。
pom.xml 定义
引入最基本的依赖
    1.8
    1.8
    2.7.7
    4.12
    3.7.0


        org.apache.dubbo
        dubbo
        ${dubbo.version}


        org.apache.dubbo
        dubbo-dependencies-zookeeper
        ${dubbo.version}
        pom


            org.apache.maven.plugins
            maven-compiler-plugin
            ${maven-compiler-plugin.version}

                ${source.level}
                ${target.level}
接口定义
接口作为客户端和服务端之间的约定,如下:
public interface DemoService {

    String say();

}
越抽象越简单,意味着越稳定。
一般公司中,服务端系统都会将接口打包上传到公司的私服 neuxs 仓库,便于客户端下载使用。
服务端
服务端针对上面的接口,实现如下:
public class DemoServiceImpl implements DemoService {
    @Override
    public String say() {
        return "hello";
    }
}
服务端启动该代码:
import org.apache.dubbo.config.ApplicationConfig;
import org.apache.dubbo.config.RegistryConfig;
import org.apache.dubbo.config.ServiceConfig;

import java.util.concurrent.CountDownLatch;

public class Server {
    private static String zookeeperHost = System.getProperty("zookeeper.address", "127.0.0.1");

    public static void main(String[] args) throws Exception {
        ServiceConfig service = new ServiceConfig<>();
        service.setApplication(new ApplicationConfig("first-dubbo-provider"));
        service.setRegistry(new RegistryConfig("zookeeper://" + zookeeperHost + ":2181"));
        service.setInterface(DemoService.class);
        service.setRef(new DemoServiceImpl());
        service.export();

        System.out.println("dubbo service started");
        new CountDownLatch(1).await();
    }

}
这里我们依赖了 zookeeper 作为注册中心,你需要首先启动 zookeeper。
客户端
客户端和服务端的唯一依赖就是接口,这样以后服务端变更客户端基本可以不关心。
这位分布式系统中的协作开发,提供了极大的便利性。
import org.apache.dubbo.config.ApplicationConfig;
import org.apache.dubbo.config.ReferenceConfig;
import org.apache.dubbo.config.RegistryConfig;

/**
 * @author 老马啸西风
 * @since 1.0.0
 */
public class Client {

    private static String zookeeperHost = System.getProperty("zookeeper.address", "127.0.0.1");

    public static void main(String[] args) {
        ReferenceConfig reference = new ReferenceConfig<>();
        reference.setApplication(new ApplicationConfig("first-dubbo-consumer"));
        reference.setRegistry(new RegistryConfig("zookeeper://" + zookeeperHost + ":2181"));
        reference.setInterface(DemoService.class);
        DemoService service = reference.get();
        String message = service.say();
        System.out.println(message);
    }

}
日志输出如下:
hello虽说用起来非常简单,但是底层的原理还是相对比价复杂的。我们后续会展开 rpc 手写实现系列,感兴趣的可以关注一波。
spring xml 配置
说明
spring xml 配置曾经风靡一时,我们这里作为经典版本给大家演示一下。
毕竟 dubbo 和 spring 的整合,使用起来才是更加方便。
宝剑配英雄,更能章显威力。
maven 依赖
这次需要和 spring 整合,所以新增了 spring 的相关依赖。
    3.7.0
    1.8
    1.8
    2.7.7
    4.3.16.RELEASE


        org.apache.dubbo
        dubbo
        ${dubbo.version}


        org.apache.dubbo
        dubbo-dependencies-zookeeper
        ${dubbo.version}
        pom


        org.springframework
        spring-context
        ${spring.version}


            org.apache.maven.plugins
            maven-compiler-plugin
            ${maven-compiler-plugin.version}

                ${source.level}
                ${target.level}
接口定义和实现
和上面一样,此处不再赘述。
内嵌 zk
这里官方 demo 引入了一个内嵌的 zk 类 EmbeddedZooKeeper,这样基本的学习演示,就可以不用下载 apache zookeeper 了。
服务端
服务端作为服务的提供者,声明如下:
public class BasicProvider {

    public static void main(String[] args) throws Exception {
        new EmbeddedZooKeeper(2181, false).start();
        // wait for embedded zookeeper start completely.
        Thread.sleep(1000);

        ClassPathXmlApplicationContext context = new ClassPathXmlApplicationContext("spring/dubbo-demo-provider.xml");
        context.start();

        System.out.println("dubbo service started");
        new CountDownLatch(1).await();
    }
}
其中 dubbo-demo-provider.xml 是 xml 配置,如下:
这里就是暴露了对应的接口服务,并且指定了 zk 的注册地址。
客户端
实现如下:
package com.github.houbb.dubbo.learn.basic;

import org.springframework.context.support.ClassPathXmlApplicationContext;

public class BasicConsumer {

    public static void main(String[] args) {
        ClassPathXmlApplicationContext context = new ClassPathXmlApplicationContext("spring/dubbo-demo-consumer.xml");
        context.start();
        DemoService demoService = (DemoService) context.getBean("demoService");
        String hello = demoService.say();
        System.out.println(hello);
    }

}
其中 dubbo-demo-consumer.xml 的实现如下:
这里指定了 zk 的地址,并且指定了 DemoService 对应的 dubbo 实现依赖。
测试
首先启动服务端,然后启动客户端。
启动客户端时报错如下:
[DUBBO] qos-server can not bind localhost:22222, dubbo version: 2.6.4, current host: 169.254.68.252
java.net.BindException: Address already in use: bind

[DUBBO] Fail to start qos server: , dubbo version: 2.6.4, current host: 169.254.68.252
java.net.BindException: Address already in use: bind- 问题原因
Qos=Quality of Service,qos是Dubbo的在线运维命令,可以对服务进行动态的配置、控制及查询。
consumer启动时qos-server也是使用的默认的22222端口,但是这时候端口已经被provider给占用了,所以才会报错的。
- 解决方案
我们将 dubbo-demo-consumer.xml application 配置进行调整,指定一个不同的端口即可。
重新启动测试通过。
spring @Bean 方式
当然,如果你不喜欢 xml,也可使用配置扥方式。
package com.github.houbb.dubbo.learn.basic.annotation;

import com.github.houbb.dubbo.learn.basic.DemoService;
import org.apache.dubbo.config.ApplicationConfig;
import org.apache.dubbo.config.ReferenceConfig;
import org.apache.dubbo.config.RegistryConfig;
import org.springframework.context.annotation.Bean;
import org.springframework.context.annotation.Configuration;

@Configuration
public class DubboConfig {

    @Bean
    public ApplicationConfig applicationConfig() {
        ApplicationConfig applicationConfig = new ApplicationConfig();
        applicationConfig.setName("consumer-of-helloworld-app");
        return applicationConfig;
    }

    @Bean
    public RegistryConfig registryConfig() {
        RegistryConfig registryConfig = new RegistryConfig();
        registryConfig.setAddress("zookeeper://127.0.0.1:2181");
        return registryConfig;
    }

    @Bean
    public ReferenceConfig demoServiceConfig() {
        ReferenceConfig referenceConfig = new ReferenceConfig<>();
        referenceConfig.setApplication(applicationConfig());
        referenceConfig.setRegistry(registryConfig());
        referenceConfig.setInterface(DemoService.class);
        referenceConfig.setCheck(true);
        referenceConfig.setCluster("");
        return referenceConfig;
    }

    @Bean
    public DemoService demoService() {
        return demoServiceConfig().get();
    }

}
有些配置可以合并简化。
启动类:
import com.github.houbb.dubbo.learn.basic.DemoService;
import org.springframework.context.annotation.AnnotationConfigApplicationContext;

public class ConsumerApplication {

    public static void main(String[] args) {
        AnnotationConfigApplicationContext context = new AnnotationConfigApplicationContext(DubboConfig.class);
        context.start();
        DemoService demoService = context.getBean(DemoService.class);
        String hello = demoService.say();
        System.out.println(hello);
    }

}
这样也是可以的。
注解版本
说明
个人最喜欢的还是注解版本,实现起来更加优雅。
定义
接口定义和内嵌的 zk 和上面一样,不再赘述。
服务端
代码
注意,这里使用 @DubboService 修饰实现类。
package com.github.houbb.dubbo.learn.annotation.provider;

import com.github.houbb.dubbo.learn.annotation.api.DemoService;
import org.apache.dubbo.config.annotation.DubboService;

/**
 * @author 老马啸西风
 * @since 1.0.0
 */
@DubboService
public class DemoServiceImpl implements DemoService {
    @Override
    public String say() {
        return "hello";
    }
}
服务端配置类:
package com.github.houbb.dubbo.learn.annotation.provider;

import org.apache.dubbo.config.spring.context.annotation.EnableDubbo;
import org.springframework.context.annotation.Configuration;
import org.springframework.context.annotation.PropertySource;

/**
 * @author binbin.hou
 * @since 1.0.0
 */
@Configuration
@EnableDubbo(scanBasePackages = "com.github.houbb.dubbo.learn.annotation.provider")
@PropertySource("classpath:dubbo-provider.properties")
public class ProviderConfiguration {
}
这里通过 @EnableDubbo 执行扫包操作。
- dubbo-provider.properties 配置
内容如下:
dubbo.application.name=annotation-provider
dubbo.registry.address=zookeeper://127.0.0.1:2181
dubbo.protocol.name=dubbo
dubbo.protocol.port=20880
客户端
package com.github.houbb.dubbo.learn.annotation.consumer;

import com.github.houbb.dubbo.learn.annotation.api.DemoService;
import org.apache.dubbo.config.annotation.DubboReference;
import org.springframework.stereotype.Component;

/**
 * @author 老马啸西风
 * @since 1.0.0
 */
@Component
public class AnnotationAction {

    @DubboReference
    private DemoService demoService;

    public String say() {
        return demoService.say();
    }

}
这里通过 @DubboReference 注解注入依赖的服务。
客户端配置注解如下:
package com.github.houbb.dubbo.learn.annotation.consumer;

import org.apache.dubbo.config.spring.context.annotation.EnableDubbo;
import org.springframework.context.annotation.ComponentScan;
import org.springframework.context.annotation.Configuration;
import org.springframework.context.annotation.PropertySource;

/**
 * @author 老马啸西风
 * @since 1.0.0
 */
@Configuration
@EnableDubbo(scanBasePackages = "com.github.houbb.dubbo.learn.annotation.client")
@PropertySource("classpath:dubbo-consumer.properties")
@ComponentScan(value = {"com.github.houbb.dubbo.learn.annotation.consumer"})
public class ConsumerConfiguration {
}
其中 dubbo-consumer.properties 配置如下:
# dubbo-consumer.properties
dubbo.application.name=annotation-consumer
dubbo.registry.address=zookeeper://127.0.0.1:2181
dubbo.consumer.timeout=3000
测试
启动服务端
package com.github.houbb.dubbo.learn.annotation;


import com.github.houbb.dubbo.learn.annotation.provider.ProviderConfiguration;
import org.springframework.context.annotation.AnnotationConfigApplicationContext;

import java.util.concurrent.CountDownLatch;

public class AnnotationProviderBootstrap {

    public static void main(String[] args) throws Exception {
        new EmbeddedZooKeeper(2181, false).start();

        AnnotationConfigApplicationContext context = new AnnotationConfigApplicationContext(ProviderConfiguration.class);
        context.start();

        System.out.println("dubbo service started.");
        new CountDownLatch(1).await();
    }

}
日志如下:
dubbo service started.启动客户端
package com.github.houbb.dubbo.learn.annotation;

import com.github.houbb.dubbo.learn.annotation.consumer.AnnotationAction;
import com.github.houbb.dubbo.learn.annotation.consumer.ConsumerConfiguration;
import org.springframework.context.annotation.AnnotationConfigApplicationContext;

public class AnnotationConsumerBootstrap {

    public static void main(String[] args) {
        AnnotationConfigApplicationContext context = new AnnotationConfigApplicationContext(ConsumerConfiguration.class);
        context.start();
        final AnnotationAction annotationAction = (AnnotationAction) context.getBean("annotationAction");

        System.out.println("hello : " + annotationAction.say());
    }


}
日志如下:
hello : hello小结
本次的 dubbo 入门实战到这里就告一段落了。
dubbo 让远程服务调用起来像本地一样自然,和 spring 整合为我们提供了更大的编程便利性。
后续我们将和大家一起实现属于自己的 RPC 框架,感兴趣的小伙伴可以关注一波,实时获得最新消息。
希望本文对你有所帮助,如果喜欢,欢迎点赞收藏转发一波。
我是老马,期待与你的下次相遇。
Dubbo admin
You can download the code from https://github.com/alibaba/dubbo, and package the dubbo-admin
houbinbindeMacBook-Pro:dubbo-admin houbinbin$ pwd
/Users/houbinbin/it/code/dubbo/dubbo-admin
houbinbindeMacBook-Pro:dubbo-admin houbinbin$ mvn package -Dmaven.skip.test=true
Download dubbo-admin-2.5.4-SNAPSHOT.war into tomcat/webapps, and rename to ROOT.war
- config tomcat
edit the tomcat port(default is 8080) after these:
change the content to:
- start tomcat
houbinbindeMacBook-Pro:bin houbinbin$ pwd
/Users/houbinbin/it/tools/tomcat/tomcat8/bin

houbinbindeMacBook-Pro:bin houbinbin$ sh startup.sh
Using CATALINA_BASE:   /Users/houbinbin/it/tools/tomcat/tomcat8
Using CATALINA_HOME:   /Users/houbinbin/it/tools/tomcat/tomcat8
Using CATALINA_TMPDIR: /Users/houbinbin/it/tools/tomcat/tomcat8/temp
Using JRE_HOME:        /Library/Java/JavaVirtualMachines/jdk1.8.0_91.jdk/Contents/Home
Using CLASSPATH:       /Users/houbinbin/it/tools/tomcat/tomcat8/bin/bootstrap.jar:/Users/houbinbin/it/tools/tomcat/tomcat8/bin/tomcat-juli.jar
Tomcat started.- visit dobbo admin in browser
URL:    localhost:8888

root/root
Hello World
zookeeper
First of all, you need start your zookeeper.
houbinbindeMacBook-Pro:bin houbinbin$ ./zkServer.sh start
ZooKeeper JMX enabled by default
Using config: /Users/houbinbin/it/tools/zookeeper/server1/zookeeper-3.4.9/bin/../conf/zoo.cfg
Starting zookeeper ... STARTED
houbinbindeMacBook-Pro:bin houbinbin$ pwd
/Users/houbinbin/it/tools/zookeeper/server1/zookeeper-3.4.9/bin
houbinbindeMacBook-Pro:bin houbinbin$ jps
32082
34610 QuorumPeerMain
34613 Jps
30221 Bootstrap
provider
File tree
|____main
| |____java
| | |____com
| | | |____ryo
| | | | |____model
| | | | | |____User.java
| | | | |____Provider.java
| | | | |____service
| | | | | |____impl
| | | | | | |____UserServiceImpl.java
| | | | | |____UserService.java
| |____resources
| | |____app-core.xml
| | |____applicationContext-beans.xml
| | |____applicationContext-dubbo-provider.xml
| | |____log4j2.xml
|____test
---- pom.xml
User.java
@Data
public class User implements Serializable {

  private Long id;

  private String username;
}
UserService.java
public interface UserService {
  User getUser(Long id);
}
UserServiceImpl.java
@Service("userService")
public class UserServiceImpl implements UserService {

  public User getUser(Long id) {
    User user = new User();
    user.setId(id);
    user.setUsername("name"+id);
    return user;
  }

}
pom.xml
    4.0.0

    com.ryo
    dubbo-provider
    1.0-SNAPSHOT


        UTF-8
        2.2
        2.18.1


        4.2.6.RELEASE

        2.6


            org.springframework
            spring-core
            ${spring.version}


            org.springframework
            spring-context
            ${spring.version}


            org.springframework
            spring-context-support
            ${spring.version}


            org.springframework
            spring-test
            ${spring.version}
            provided


            junit
            junit
            4.11
            test


            com.alibaba
            dubbo
            2.5.3


            com.101tec
            zkclient
            0.4


            org.apache.logging.log4j
            log4j-api
            ${log4j.version}


            org.apache.logging.log4j
            log4j-core
            ${log4j.version}


            org.apache.logging.log4j
            log4j-web
            ${log4j.version}


            org.projectlombok
            lombok
            1.16.10


                org.apache.tomcat.maven
                tomcat7-maven-plugin
                ${plugin.tomcat.version}

                    8081
                    /
                    ${project.build.sourceEncoding}


                org.apache.maven.plugins
                maven-surefire-plugin
                ${maven-surefire-plugin.version}

                    true
                    true
app-core.xml
applicationContext-beans.xml
-->applicationContext-dubbo-provider.xml
log4j2.xml
- Main()
public class Provider {

  public static void main(String[] args) throws IOException {
    ClassPathXmlApplicationContext context = new ClassPathXmlApplicationContext(new String[] {"app-core.xml"});
    context.start();
    System.out.println("dubbo-provider start...");
    System.in.read(); // 按任意键退出
  }

}
start the main()
dubbo-provider start...- visit the dubbo-admin
If you see this, you are success of half...

customer
Well, customer is most the same as provider. It's File tree:
.
|____main
| |____java
| | |____com
| | | |____ryo
| | | | |____model
| | | | | |____User.java
| | | | |____service
| | | | | |____UserService.java
| |____resources
| | |____app-core.xml
| | |____applicationContext-beans.xml
| | |____applicationContext-dubbo-customer.xml
| | |____log4j2.xml
|____test
| |____java
| | |____com
| | | |____ryo
| | | | |____service
| | | | | |____UserServiceTest.java
applicationContext-dubbo-customer.xml
UserServiceTest.java
@RunWith(SpringJUnit4ClassRunner.class)
@ContextConfiguration(locations = {"classpath:/app-core.xml"})
@Log4j2
public class UserServiceTest {

  @Resource
  private UserService userService;

  @Test
  public void getUserTest() {
    User user = userService.getUser(2L);
    log.info("user info:{}", user);
  }
}
result
23:31:47.259 [main] INFO  com.ryo.service.UserServiceTest - user info:User{id=2, username='name2'}

Process finished with exit code 0
Multi-Maven & Nexus
As you can see, the User.java and UserService.java we have write it twice.
We can make it into jar, and use it.
- Provider
- Provider interface jar
$   cd facade
$   mvn clean install

houbinbindeMacBook-Pro:target houbinbin$ pwd
/Users/houbinbin/IT/code/provider/facade/target
houbinbindeMacBook-Pro:target houbinbin$ ls
classes                 facade-1.0-SNAPSHOT.jar generated-sources       maven-archiver          maven-status
Into local
We can add the facade-1.0-SNAPSHOT.jar into maven local repository
mvn install:install-file -Dfile=${jar-path} -DgroupId=com.ryo -DartifactId=${artifactId} -Dversion=${version} -Dpackaging=jarthen
mvn install:install-file -Dfile=/Users/houbinbin/IT/code/provider/facade/target/facade-1.0-SNAPSHOT.jar -DgroupId=com.ryo -DartifactId=facade -Dversion=1.0-SNAPSHOT -Dpackaging=jar

...
[INFO] --- maven-install-plugin:2.4:install-file (default-cli) @ standalone-pom ---
[INFO] Installing /Users/houbinbin/IT/code/provider/facade/target/facade-1.0-SNAPSHOT.jar to /Users/houbinbin/.m2/repository/com/ryo/facade/1.0-SNAPSHOT/facade-1.0-SNAPSHOT.jar
[INFO] ------------------------------------------------------------------------
[INFO] BUILD SUCCESS
[INFO] ------------------------------------------------------------------------
[INFO] Total time: 0.280 s
[INFO] Finished at: 2016-09-27T23:10:42+08:00
[INFO] Final Memory: 9M/309M
[INFO] ------------------------------------------------------------------------
Use the
facade-1.0-SNAPSHOT.jarin customer
- pom.xml
    com.ryo
    facade
1.0-SNAPSHOT- customer tree
|____main
| |____java
| |____resources
| | |____app-core.xml
| | |____applicationContext-beans.xml
| | |____applicationContext-dubbo-customer.xml
| | |____log4j2.xml
|____test
| |____java
| | |____com
| | | |____ryo
| | | | |____facade
| | | | | |____UserFacadeTest.java- UserFacadeTest.java
@RunWith(SpringJUnit4ClassRunner.class)
@ContextConfiguration(locations = {"classpath:/app-core.xml"})
@Log4j2
public class UserFacadeTest {
  @Autowired
  private UserFacade userFacade;

  @Test
  public void getUserTest() {
    UserResponse userResponse = userFacade.getUser(2L);
    log.info("userResponse:{}", userResponse);
  }
}
result:
23:21:11.040 [main] INFO  com.ryo.facade.UserFacadeTest - userResponse:UserResponse(id=2, username=name2)

Process finished with exit code 0