Google Authenticator 原理及 Java 实现
实现原理:
一、用户需要开启 Google Authenticator 服务时,
-
服务器随机生成一个类似于『DPI45HKISEXU6HG7』的密钥,并且把这个密钥保存在数据库中。
-
在页面上显示一个二维码,内容是一个 URI 地址(
otpauth://totp/ 账号?secret = 密钥),如『otpauth://totp/kisexu@gmail.com?secret=DPI45HCEBCJK6HG7』,下图:
otpauth://totp/kisexu@gmail.com?secret=DPI45HCEBCJK6HG7 (二维码自动识别)
- 客户端扫描二维码,把密钥『DPI45HKISEXU6HG7』保存在客户端。
二、用户需要登陆时
1) 客户端每 30 秒使用密钥『DPI45HKISEXU6HG7』和时间戳通过一种『算法』生成一个 6 位数字的一次性密码,如『684060』。
如下图 android 版界面:
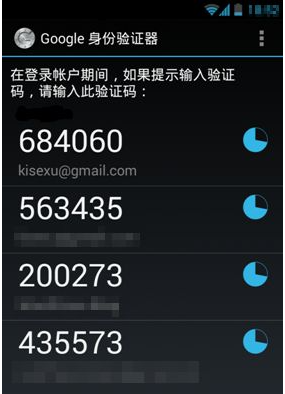
2) 用户登陆时输入一次性密码『684060』。
3) 服务器端使用保存在数据库中的密钥『DPI45HKISEXU6HG7』和时间戳通过同一种『算法』生成一个 6 位数字的一次性密码。
大家都懂控制变量法,如果算法相同、密钥相同,又是同一个时间(时间戳相同),那么客户端和服务器计算出的一次性密码是一样的。
服务器验证时如果一样,就登录成功了。
Tips
1) 这种『算法』是公开的,所以服务器端也有很多开源的实现,比如 php 版的:
上 github 搜索『Google Authenticator』可以找到更多语言版的 Google Authenticator。
2) 所以,你在自己的项目可以轻松加入对 Google Authenticator 的支持,在一个客户端上显示多个账户的效果可以看上面 android 版界面的截图。
目前 dropbox、lastpass、wordpress,甚至 vps 等第三方应用都支持 Google Authenticator 登陆,请自行搜索。
3) 现实生活中,网银、网络游戏的实体动态口令牌其实原理也差不多,大家可以自行脑补。
代码实现
GoogleAuthenticator.java
import java.security.InvalidKeyException;
import java.security.NoSuchAlgorithmException;
import java.security.SecureRandom;

import javax.crypto.Mac;
import javax.crypto.spec.SecretKeySpec;

import org.apache.commons.codec.binary.Base32;
import org.apache.commons.codec.binary.Base64;

public class GoogleAuthenticator {
	// 生成的key长度( Generate secret key length)

	public static final int SECRET_SIZE = 10;

	public static final String SEED = "g8GjEvTbW5oVSV7avL47357438reyhreyuryetredLDVKs2m0QN7vxRs2im5MDaNCWGmcD2rvcZx";// Java实现随机数算法

	public static final String RANDOM_NUMBER_ALGORITHM = "SHA1PRNG";// 最多可偏移的时间

	int window_size = 3; // default 3 - max 17

	/**
	 * * set the windows size. This is an integer value representing the number of *
	 * 30 second windows we allow The bigger the window, the more tolerant of *
	 * clock skew we are. * * @param s * window size - must be >=1 and <=17. Other
	 * values are ignored 5 * 动态密码3分钟 4 动态密码2.5分钟 3 动态密码2分钟 2 动态密码1.5分钟 1 动态密码1分钟
	 */
	public void setWindowSize(int s) {
		if (s >= 1 && s <= 17)
			window_size = s;
	}

	/**
	 * * Generate a random secret key. This must be saved by the server and *
	 * associated with the users account to verify the code displayed by Google *
	 * Authenticator. The user must register this secret on their device. * 生成一个随机秘钥
	 * * * @return secret key
	 */
	public static String generateSecretKey() {
		SecureRandom sr = null;
		try {
			sr = SecureRandom.getInstance(RANDOM_NUMBER_ALGORITHM);
			sr.setSeed(Base64.decodeBase64(SEED));
			byte[] buffer = sr.generateSeed(SECRET_SIZE);
			Base32 codec = new Base32();
			byte[] bEncodedKey = codec.encode(buffer);
			String encodedKey = new String(bEncodedKey);
			return encodedKey;
		} catch (NoSuchAlgorithmException e) {
			// should never occur... configuration error
		}
		return null;
	}

	/**
	 * * Return a URL that generates and displays a QR barcode. The user scans *
	 * this bar code with the Google Authenticator application on their * smartphone
	 * to register the auth code. They can also manually enter the * secret if
	 * desired * * @param user * user id (e.g. fflinstone) * @param host * host or
	 * system that the code is for (e.g. myapp.com) * @param secret * the secret
	 * that was previously generated for this user * @return the URL for the QR code
	 * to scan
	 */
	public static String getQRBarcodeURL(String user, String host, String secret) {
		String format = "http://www.google.com/chart?chs=200x200&chld=M%%7C0&cht=qr&chl=otpauth://totp/%s@%s?secret=%s";
		return String.format(format, user, host, secret);
	}

	/**
	 * * 生成一个google身份验证器,识别的字符串,只需要把该方法返回值生成二维码扫描就可以了。 * * @param user * 账号 * @param
	 * secret * 密钥 * @return
	 */
	public static String getQRBarcode(String user, String secret) {
		String format = "otpauth://totp/%s?secret=%s";
		return String.format(format, user, secret);
	}

	/**
	 * * Check the code entered by the user to see if it is valid 验证code是否合法 *
	 * * @param secret * The users secret. * @param code * The code displayed on the
	 * users device * @param t * The time in msec (System.currentTimeMillis() for
	 * example) * @return
	 */
	public boolean check_code(String secret, long code, long timeMsec) {
		Base32 codec = new Base32();
		byte[] decodedKey = codec.decode(secret);
		// convert unix msec time into a 30 second "window"
		// this is per the TOTP spec (see the RFC for details)
		long t = (timeMsec / 1000L) / 30L;
		// Window is used to check codes generated in the near past.
		// You can use this value to tune how far you're willing to go.
		for (int i = -window_size; i <= window_size; ++i) {
			long hash;
			try {
				hash = verify_code(decodedKey, t + i);
			} catch (Exception e) {
				// Yes, this is bad form - but
				// the exceptions thrown would be rare and a static
				// configuration problem
				e.printStackTrace();
				throw new RuntimeException(e.getMessage());
				// return false;
			}
			if (hash == code) {
				return true;
			}
		}
		// The validation code is invalid.
		return false;
	}

	private static int verify_code(byte[] key, long t) throws NoSuchAlgorithmException, InvalidKeyException {
		byte[] data = new byte[8];
		long value = t;
		for (int i = 8; i-- > 0; value >>>= 8) {
			data[i] = (byte) value;
		}
		SecretKeySpec signKey = new SecretKeySpec(key, "HmacSHA1");
		Mac mac = Mac.getInstance("HmacSHA1");
		mac.init(signKey);
		byte[] hash = mac.doFinal(data);
		int offset = hash[20 - 1] & 0xF;
		// We're using a long because Java hasn't got unsigned int.
		long truncatedHash = 0;
		for (int i = 0; i < 4; ++i) {
			truncatedHash <<= 8;
			// We are dealing with signed bytes:
			// we just keep the first byte.
			truncatedHash |= (hash[offset + i] & 0xFF);
		}
		truncatedHash &= 0x7FFFFFFF;
		truncatedHash %= 1000000;
		return (int) truncatedHash;
	}
}
GooGleAuthenticatorTest.java
测试代码如下:
import org.junit.jupiter.api.Test;

public class GooGleAuthenticatorTest {

	// 当测试authTest时候,把genSecretTest生成的secret值赋值给它
	private static String secret = "R2Q3S52RNXBTFTOM";

	@Test
	public void genSecretTest() {// 生成密钥
		// secret = GoogleAuthenticator.generateSecretKey();
		// 把这个qrcode生成二维码,用google身份验证器扫描二维码就能添加成功
		String qrcode = GoogleAuthenticator.getQRBarcode("983126@qq.com", secret);
		System.out.println("qrcode:" + qrcode + ",key:" + secret);
	}

	public static void main(String[] args) {
		secret = GoogleAuthenticator.generateSecretKey();
		// 把这个qrcode生成二维码,用google身份验证器扫描二维码就能添加成功
		String qrcode = GoogleAuthenticator.getQRBarcode("983126@qq.com", secret);
		System.out.println("qrcode:" + qrcode + ",key:" + secret);
		System.out.println("########################################");
		long code = 251665;
		long t = System.currentTimeMillis();
		GoogleAuthenticator ga = new GoogleAuthenticator();
		ga.setWindowSize(5);
		boolean r = ga.check_code(secret, code, t);
		System.out.println("检查code是否正确?" + r);

		String secret1 = "R2Q3S52RNXBTFTOM";
		long code1 = 867255;
		long t1 = System.currentTimeMillis();
		GoogleAuthenticator ga1 = new GoogleAuthenticator();
		ga1.setWindowSize(5);
		boolean r1 = ga1.check_code(secret1, code1, t1);
		System.out.println("检查code1是否正确?" + r1);
	}
	/**
	 * 对app的随机生成的code,输入并验证 WindowSize5 动态密码3分钟 WindowSize4 动态密码2.5分钟 WindowSize3
	 * 动态密码2分钟 WindowSize2 动态密码1.5分钟 WindowSize1 动态密码1分钟
	 */
	@Test
	public void verifyTest() {
		long code = 300884; // 14:44:00
		long t = System.currentTimeMillis();
		GoogleAuthenticator googleAuthenticator = new GoogleAuthenticator();
		googleAuthenticator.setWindowSize(1);
		boolean r = googleAuthenticator.check_code(secret, code, t);
		System.out.println("检查code是否正确?" + r);
	}
}
内网的测试验证
maven 引入
<dependencies>
  <dependency>
    <groupId>commons-codec</groupId>
    <artifactId>commons-codec</artifactId>
    <version>1.14</version>
  </dependency>
  <dependency>
    <groupId>com.google.zxing</groupId>
    <artifactId>core</artifactId>
    <version>3.4.1</version>
  </dependency>
  <dependency>
    <groupId>junit</groupId>
    <artifactId>junit</artifactId>
    <version>4.11</version>
    <scope>test</scope>
  </dependency>
</dependencies>
编码实现
GoogleAuthenticatorUtils.java
import org.apache.commons.codec.binary.Base32;
import org.apache.commons.codec.binary.Base64;

import javax.crypto.Mac;
import javax.crypto.spec.SecretKeySpec;
import java.security.InvalidKeyException;
import java.security.NoSuchAlgorithmException;
import java.security.SecureRandom;


/**
 * @author alexhu
 *     主要功能:生成密钥、生成二维码内容、校验身份
 *     依赖:
 *     <dependency>
 *       <groupId>commons-codec</groupId>
 *       <artifactId>commons-codec</artifactId>
 *       <version>1.14</version>
 *     </dependency>
 */
public class GoogleAuthenticatorUtils {

    public static final int SECRET_SIZE = 10;

    public static final String SEED = "g8GjEvTbW5oVSV7avLBdwIHqGlUYNzKFI7izOF8GwLDVKs2m0QN7vxRs2im5MDaNCWGmcD2rvcZx";

    public static final String RANDOM_NUMBER_ALGORITHM = "SHA1PRNG";

    /**
     * default 3 - max 17 (from google docs)最多可偏移的时间
     */
    int window_size = 3;

    public void setWindowSize(int s) {
        if (s >= 1 && s <= 17) {
            window_size = s;
        }
    }

    /**
     * 验证身份验证码是否正确
     *
     * @param codes       输入的身份验证码
     * @param savedSecret 密钥
     * @return
     */
    public static Boolean authcode(String codes, String savedSecret) {
        long code = 0;
        try {
            code = Long.parseLong(codes);
        } catch (Exception e) {
            e.printStackTrace();
        }
        long t = System.currentTimeMillis();
        GoogleAuthenticatorUtils ga = new GoogleAuthenticatorUtils();

        // should give 5 * 30 seconds of grace...
        ga.setWindowSize(ga.window_size);

        return ga.check_code(savedSecret, code, t);
    }

    /**
     * 获取密钥
     *
     * @param user 用户
     * @param host 域
     * @return 密钥
     */
    public static String genSecret(String user, String host) {
        String secret = GoogleAuthenticatorUtils.generateSecretKey();
        GoogleAuthenticatorUtils.getQRBarcodeURL(user, host, secret);
        return secret;
    }

    /**
     * 生成密钥
     *
     * @return
     */
    private static String generateSecretKey() {
        SecureRandom sr = null;
        try {
            sr = SecureRandom.getInstance(RANDOM_NUMBER_ALGORITHM);
            sr.setSeed(Base64.decodeBase64(SEED));
            byte[] buffer = sr.generateSeed(SECRET_SIZE);
            Base32 codec = new Base32();
            byte[] bEncodedKey = codec.encode(buffer);
            String encodedKey = new String(bEncodedKey);
            return encodedKey;
        } catch (NoSuchAlgorithmException e) {
            // should never occur... configuration error
        }
        return null;
    }

    /**
     * 获取二维码内容URL
     *
     * @param user   用户
     * @param host   域
     * @param secret 密钥
     * @return 二维码URL
     */
    public static String getQRBarcodeURL(String user, String host, String secret) {
        String format = "otpauth://totp/%s@%s?secret=%s";
        return String.format(format, user, host, secret);
    }

    /**
     * 校验code是否正确
     *
     * @param secret 密钥
     * @param code   动态code
     * @param timeMsec 时间
     * @return
     */
    private boolean check_code(String secret, long code, long timeMsec) {
        Base32 codec = new Base32();
        byte[] decodedKey = codec.decode(secret);
        long t = (timeMsec / 1000L) / 30L;
        for (int i = -window_size; i <= window_size; ++i) {
            long hash;
            try {
                hash = verify_code(decodedKey, t + i);
            } catch (Exception e) {
                e.printStackTrace();
                throw new RuntimeException(e.getMessage());
            }
            if (hash == code) {
                return true;
            }
        }
        return false;
    }

    /**
     * 时间校验密钥与code是否匹配
     *
     * @param key 解密后的密钥
     * @param t 时间
     * @return
     * @throws NoSuchAlgorithmException
     * @throws InvalidKeyException
     */
    private static int verify_code(byte[] key, long t)
            throws NoSuchAlgorithmException, InvalidKeyException {
        byte[] data = new byte[8];
        long value = t;
        for (int i = 8; i-- > 0; value >>>= 8) {
            data[i] = (byte) value;
        }
        SecretKeySpec signKey = new SecretKeySpec(key, "HmacSHA1");
        Mac mac = Mac.getInstance("HmacSHA1");
        mac.init(signKey);
        byte[] hash = mac.doFinal(data);
        int offset = hash[20 - 1] & 0xF;
        long truncatedHash = 0;
        for (int i = 0; i < 4; ++i) {
            truncatedHash <<= 8;
            truncatedHash |= (hash[offset + i] & 0xFF);
        }
        truncatedHash &= 0x7FFFFFFF;
        truncatedHash %= 1000000;
        return (int) truncatedHash;
    }

}
GenerateQRCodeUtils.java
import java.awt.image.BufferedImage;
import java.io.File;
import java.io.IOException;
import java.util.HashMap;
import java.util.Map;

import javax.imageio.ImageIO;

import com.google.zxing.BarcodeFormat;
import com.google.zxing.EncodeHintType;
import com.google.zxing.MultiFormatWriter;
import com.google.zxing.common.BitMatrix;

/**
 * @author alexhu
 *
 * 主要功能:根据二维码内容生成二维码,并保存在指定位置
 *
 * 依赖:
 *     <dependency>
 *       <groupId>com.google.zxing</groupId>
 *       <artifactId>core</artifactId>
 *       <version>3.4.1</version>
 *     </dependency>
 */
public class GenerateQRCodeUtils {
    /**
     * 二维码颜色
     */
    private static final int BLACK = 0xFF000000;
    private static final int WHITE = 0xFFFFFFFF;

    /**
     * 图片的宽度
     */
    private static int WIDTH = 200;
    /**
     * 图片的高度
     */
    private static int HEIGHT = 200;
    /**
     * 图片的格式
     */
    private static String FORMAT = "png";


    /**
     * 生成二维码
     *
     * @param basePath 配置文件定义的生成二维码存放文件夹
     * @param content 二维码内容
     * @return 文件路径
     */
    public static String generateQRCodeImg(String basePath, String content){
        try {
            Map<EncodeHintType, String> encodeMap = new HashMap<EncodeHintType, String>();
            // 内容编码,生成二维码矩阵
            encodeMap.put(EncodeHintType.CHARACTER_SET, "utf-8");
            BitMatrix bitMatrix = new MultiFormatWriter().encode(content, BarcodeFormat.QR_CODE, WIDTH, HEIGHT, encodeMap);

            File file = new File(basePath);
            if (!file.exists() && !file.isDirectory()){
                file.mkdirs();
            }

            //文件名,默认为时间为名
            String filePath = basePath + System.currentTimeMillis() + "." + FORMAT;

            File outputFile = new File(filePath);
            if (!outputFile.exists()){
                // 生成二维码文件
                writeToFile(bitMatrix, FORMAT, outputFile);
            }
            return filePath;
        } catch (Exception e) {
            e.printStackTrace();
        }
        return "";
    }

    /**
     * 把二维码矩阵保存为文件
     *
     * @param matrix 二维码矩阵
     * @param format 文件类型,这里为png
     * @param file  文件句柄
     * @throws IOException
     */
    public static void writeToFile(BitMatrix matrix, String format, File file) throws IOException {
        BufferedImage image = toBufferedImage(matrix);
        if (!ImageIO.write(image, format, file)) {
            throw new IOException("Could not write an image of format " + format + " to " + file);
        }
    }

    /**
     * 生成二维码矩阵(内存)
     *
     * @param matrix 二维码矩阵
     * @return
     */
    public static BufferedImage toBufferedImage(BitMatrix matrix) {
        int width = matrix.getWidth();
        int height = matrix.getHeight();
        BufferedImage image = new BufferedImage(width, height, BufferedImage.TYPE_INT_RGB);
        for (int x = 0; x < width; x++) {
            for (int y = 0; y < height; y++) {
                image.setRGB(x, y, matrix.get(x, y) ? BLACK : WHITE);
            }
        }
        return image;
    }
}
4.GoogleAuthenticatorTest.java
测试代码如下:
import org.junit.Test;

import static org.example.GenerateQRCodeUtils.generateQRCodeImg;
import static org.example.GoogleAuthenticatorUtils.*;

/**
 * Unit test for Google Authenticator.
 */
public class GoogleAuthenticatorTest {
    /**
     * Rigorous Test :-)
     */
    @Test
    public void genTest() {
        /*
         * 注意:先运行前两步,获取密钥和二维码url。 然后只运行第三步,填写需要验证的验证码,和第一步生成的密钥
         */
        String user = "testUser";
        String host = "test.com";
        // 第一步:获取密钥
        String secret = genSecret(user, host);
        System.out.println("secret:" + secret);
        // 第二步:根据密钥获取二维码图片url(可忽略)
        String url = getQRBarcodeURL(user, host, secret);
        System.out.println("url:" + url);
        // 第三步 生成二维码
        generateQRCodeImg("", url);
    }

    @Test
    public void verifyTest() {
        // 第四步:验证(第一个参数是需要验证的验证码,第二个参数是第一步生成的secret运行)
        boolean result = authcode("105938", "WUH2RO3Q4D53AF5Z");
        System.out.println("result:" + result);
    }
}
小结
希望本文对你有所帮助,如果喜欢,欢迎点赞收藏转发一波。
我是老马,期待与你的下次重逢。
拓展阅读
参考资料
https://my.oschina.net/lenglingx/blog/5394928
https://blog.csdn.net/dgatiger/article/details/110196740
