SOFARPC 介绍
项目简介
SOFARPC 是蚂蚁金服开源的一款基于 Java 实现的 RPC 服务框架,为应用之间提供远程服务调用能力,具有高可伸缩性,高容错性,目前蚂蚁金服所有的业务的相互间的 RPC 调用都是采用 SOFARPC。
SOFARPC 为用户提供了负载均衡,流量转发,链路追踪,链路数据透传,故障剔除等功能。
SOFARPC 还支持不同的协议,目前包括 bolt,RESTful,dubbo,H2C 协议进行通信。
其中 bolt 是蚂蚁金融服务集团开放的基于 Netty 开发的网络通信框架。
基本原理
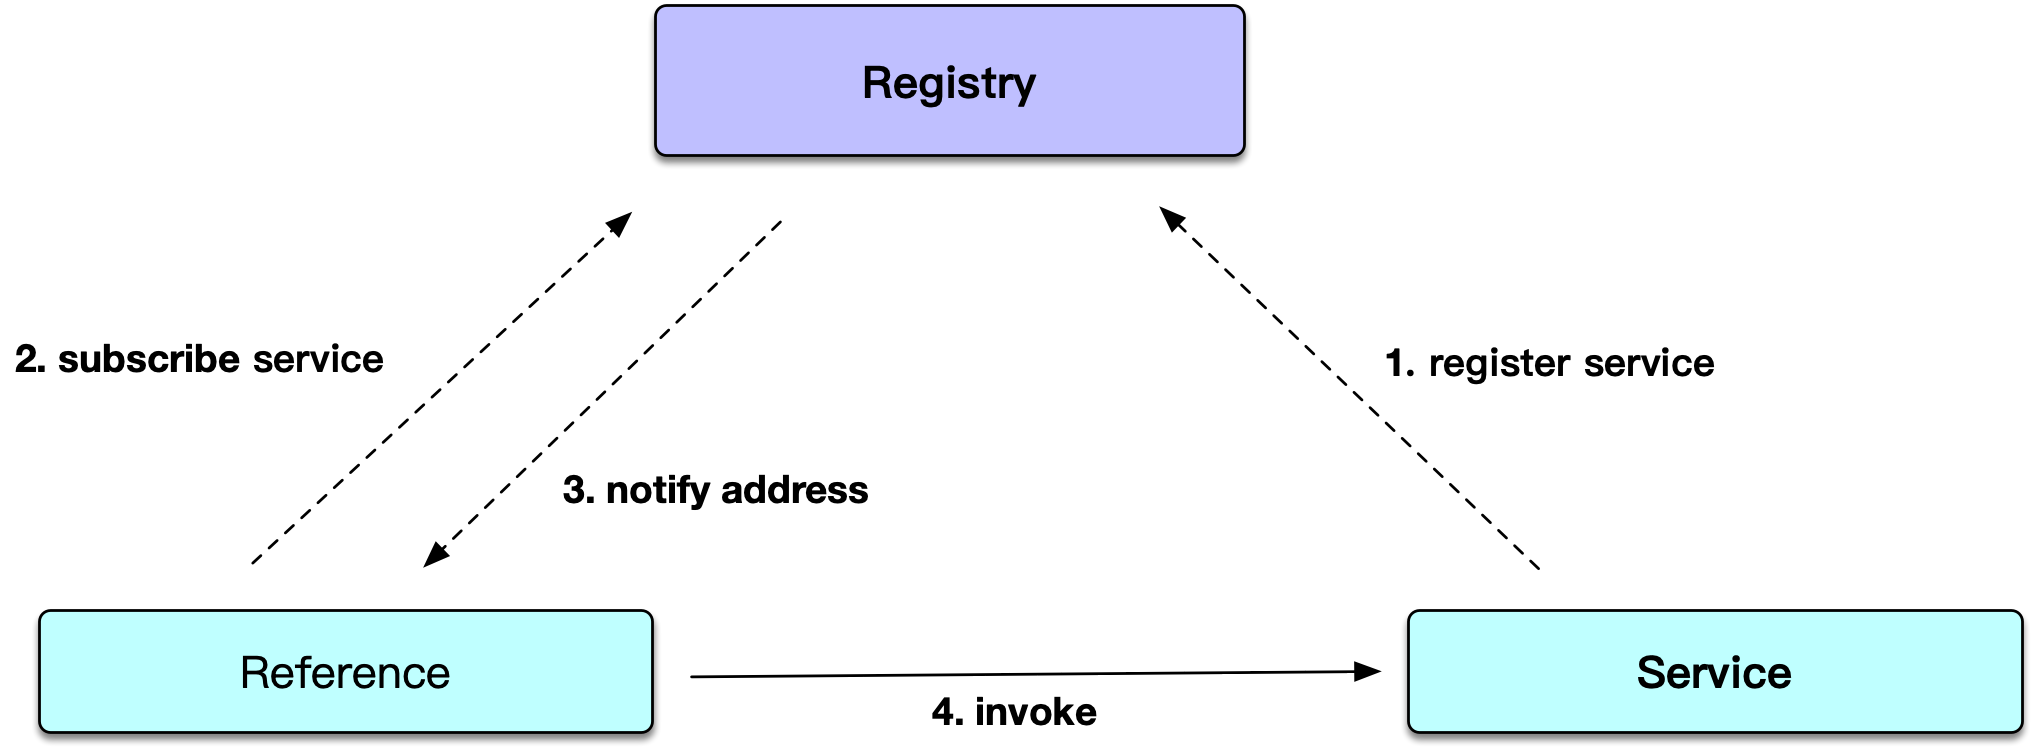
-
当一个 SOFARPC 的应用启动的时候,如果发现当前应用需要发布 RPC 服务的话,那么 SOFARPC 会将这些服务注册到服务注册中心上。如图中 Service 指向 Registry。
-
当引用这个服务的 SOFARPC 应用启动时,会从服务注册中心订阅到相应服务的元数据信息。服务注册中心收到订阅请求后,会将发布方的元数据列表实时推送给服务引用方。如图中 Registry 指向 Reference。
-
当服务引用方拿到地址以后,就可以从中选取地址发起调用了。如图中 Reference 指向 Service。
SOFARPC 方式快速入门
本文档将演示了如何应用 SOFARPC 进行服务的发布和引用。
本例将在本地模拟服务端启动监听一个端口并发布一个服务,客户端引用该服务进行直连调用。
您可以直接在工程下找到本文档的示例代码。
创建工程
需要安装 JDK 6 及以上 和 Maven 3 以上.
我们新建一个 Maven 工程,并引入 SOFARPC 的依赖。
<dependency>
    <groupId>com.alipay.sofa</groupId>
    <artifactId>sofa-rpc-all</artifactId>
    <version>最新版本</version>
</dependency>
注:最新版本可以从 https://github.com/sofastack/sofa-rpc/releases 里找到。
编写服务端实现
第一步:创建接口
/**
 * Quick Start demo interface
 */
public interface HelloService {
    String sayHello(String string);
}
第二步:创建接口实现
/**
 * Quick Start demo implement
 */
public class HelloServiceImpl implements HelloService {
    @Override
    public String sayHello(String string) {
        System.out.println("Server receive: " + string);
        return "hello " + string + " !";
    }
}
第三步:编写服务端代码
/**
 * Quick Start Server
 */
public class QuickStartServer {

    public static void main(String[] args) {
        ServerConfig serverConfig = new ServerConfig()
                .setProtocol("bolt") // 设置一个协议,默认bolt
                .setPort(12200) // 设置一个端口,默认12200
                .setDaemon(false); // 非守护线程

        ProviderConfig<HelloService> providerConfig = new ProviderConfig<HelloService>()
                .setInterfaceId(HelloService.class.getName()) // 指定接口
                .setRef(new HelloServiceImpl()) // 指定实现
                .setServer(serverConfig); // 指定服务端

        providerConfig.export(); // 发布服务
    }
}
编写客户端实现
第一步:拿到服务端接口
一般服务端会通过jar的形式将接口类提供给客户端。而在本例中,由于服务端和客户端在一个工程所以跳过。
第二步:编程客户端代码
/**
 * Quick Start client
 */
public class QuickStartClient {
    public static void main(String[] args) {
        ConsumerConfig<HelloService> consumerConfig = new ConsumerConfig<HelloService>()
            .setInterfaceId(HelloService.class.getName()) // 指定接口
            .setProtocol("bolt") // 指定协议
            .setDirectUrl("bolt://127.0.0.1:12200"); // 指定直连地址
        // 生成代理类
        HelloService helloService = consumerConfig.refer();
        while (true) {
            System.out.println(helloService.sayHello("world"));
            try {
                Thread.sleep(2000);
            } catch (Exception e) {
            }
        }
    }
}
运行
分别启动服务端和客户端,观察运行效果。
服务端将打印:
Server receive: world
客户端将打印:
hello world !
SOFABoot 方式快速入门
本文档将演示了如何在 SOFABoot 环境下应用 SOFARPC 进行服务的发布和引用。
您可以直接在工程下找到本文档的示例代码。
注意,示例代码中需要本地安装 zookeeper 环境,如果没有安装.
需要将 application.properties 中的 com.alipay.sofa.rpc.registry.address 配置注释掉.走本地文件注册中心的方式
创建工程
(1)环境准备:SOFABoot 需要 JDK7 或者 JDK8 ,需要采用 Apache Maven 2.2.5 或者以上的版本来编译。
(2)工程构建:SOFABoot 构建在 Spring Boot 之上。因此可以使用 Spring Boot 的工程生成工具 来生成一个标准的Spring Boot 工程。
(3)引入 SOFABoot 环境:生成的 Spring Boot 标准工程直接使用的 Spring Boot 的 parent 依赖,改为 SOFABoot 提供的 parent 依赖,该parent 提供并管控了多种 SOFABoot 提供的 starter。
<parent>
    <groupId>org.springframework.boot</groupId>
    <artifactId>spring-boot-starter-parent</artifactId>
    <version>${spring.boot.version}</version>
    <relativePath/>
</parent>
替换为:
<parent>
    <groupId>com.alipay.sofa</groupId>
    <artifactId>sofaboot-dependencies</artifactId>
    <version>${sofa.boot.version}</version>
</parent>
这里的 ${sofa.boot.version} 指定具体的 SOFABoot 版本,参考发布历史
(4)配置 application.properties :application.properties 是 SOFABoot 工程中的配置文件。这里需要配置一个必不可少的配置项,即应用名。
spring.application.name=AppName
(5)引入 RPC Starter:
<dependency>
 <groupId>com.alipay.sofa</groupId>
 <artifactId>rpc-sofa-boot-starter</artifactId>
</dependency>
声明 SOFABoot 的 xsd 文件:在要使用的 XML 配置文件中将头部 xsd 文件的声明设置为如下。这样就能够使用 SOFABoot 定义的 XML 元素进行开发。
<?xml version="1.0" encoding="UTF-8"?>
<beans
xmlns="http://www.springframework.org/schema/beans"
xmlns:xsi="http://www.w3.org/2001/XMLSchema-instance"
xmlns:sofa="http://sofastack.io/schema/sofaboot"
xmlns:context="http://www.springframework.org/schema/context"
xsi:schemaLocation="http://www.springframework.org/schema/beans http://www.springframework.org/schema/beans/spring-beans.xsd http://sofastack.io/schema/sofaboot http://sofastack.io/schema/sofaboot.xsd" default-autowire="byName">
定义服务接口与实现
public interface HelloSyncService {

    String saySync(String string);
}
实现:
public class HelloSyncServiceImpl implements HelloSyncService {

    @Override
    public String saySync(String string) {
        return string;
    }
}
服务端发布服务
在 xml 文件中编写如下配置。
Spring 上下文在刷新时,SOFABoot 就将该服务实现注册到了服务器上,以 bolt 协议与客户端进行通信地址,并将地址等元数据发布到了注册中心(这里默认使用的本地文件作为注册中心)。
<bean id="helloSyncServiceImpl" class="com.alipay.sofa.rpc.samples.invoke.HelloSyncServiceImpl"/>
<sofa:service ref="helloSyncServiceImpl" interface="com.alipay.sofa.rpc.samples.invoke.HelloSyncService">
    <sofa:binding.bolt/>
</sofa:service>
客户端引用服务
在 xml 文件中编写如下配置。Spring 上下文刷新时,SOFABoot 会生成一个RPC的代理 bean,即 personReferenceBolt 。这样就可以直接在代码中使用该 bean 进行远程调用了。
<sofa:reference id="helloSyncServiceReference" interface="com.alipay.sofa.rpc.samples.invoke.HelloSyncService">
    <sofa:binding.bolt/>
</sofa:reference>
运行
在 SpringBoot 的启动类中编码如下。其中利用 ImportResource 将上述的xml文件加载。
@ImportResource({ "classpath*:rpc-sofa-boot-starter-samples.xml" })
@org.springframework.boot.autoconfigure.SpringBootApplication
public class SofaBootRpcSamplesApplication {
    public static void main(String[] args) {
          SpringApplication springApplication = new SpringApplication(SofaBootRpcSamplesApplication.class);
          ApplicationContext applicationContext = springApplication.run(args);

          HelloSyncService helloSyncServiceReference = (HelloSyncService) applicationContext
            .getBean("helloSyncServiceReference");

          System.out.println(helloSyncServiceReference.saySync("sync"));
    }
}
打印结果如下:
sync
以上就完成了一次服务发布和服务引用。
